Solar panels are changing how we use energy. More homes and businesses want solar power to save money and help the environment. But, wiring solar panels is not simple. If you get it wrong, you could lose power, damage your system, or even cause safety hazards.
This guide will show you every step to wire solar panels correctly, even if you are new to electrical work. You will learn about the types of wiring, tools you need, safety steps, and even common mistakes beginners often make.
Wiring your solar panels the right way is the key to getting the most energy and keeping your system safe for years.
Understanding Solar Panel Wiring Basics
Solar panels produce electricity as direct current (DC). Most homes use alternating current (AC). Wiring connects the panels to other parts, like the inverter, batteries, and your electric grid. The way you wire panels affects how much power you get and how safe your system is.
When you wire solar panels, you need to know how electricity flows. DC power from panels must move safely to your charge controller, batteries, and then to your inverter. If you wire panels incorrectly, you will waste energy or even cause a fire.
So, you must understand the basics of DC power and how it changes to AC power for your home.
Series Vs Parallel Wiring
You can wire panels in series or parallel. Each method has pros and cons.
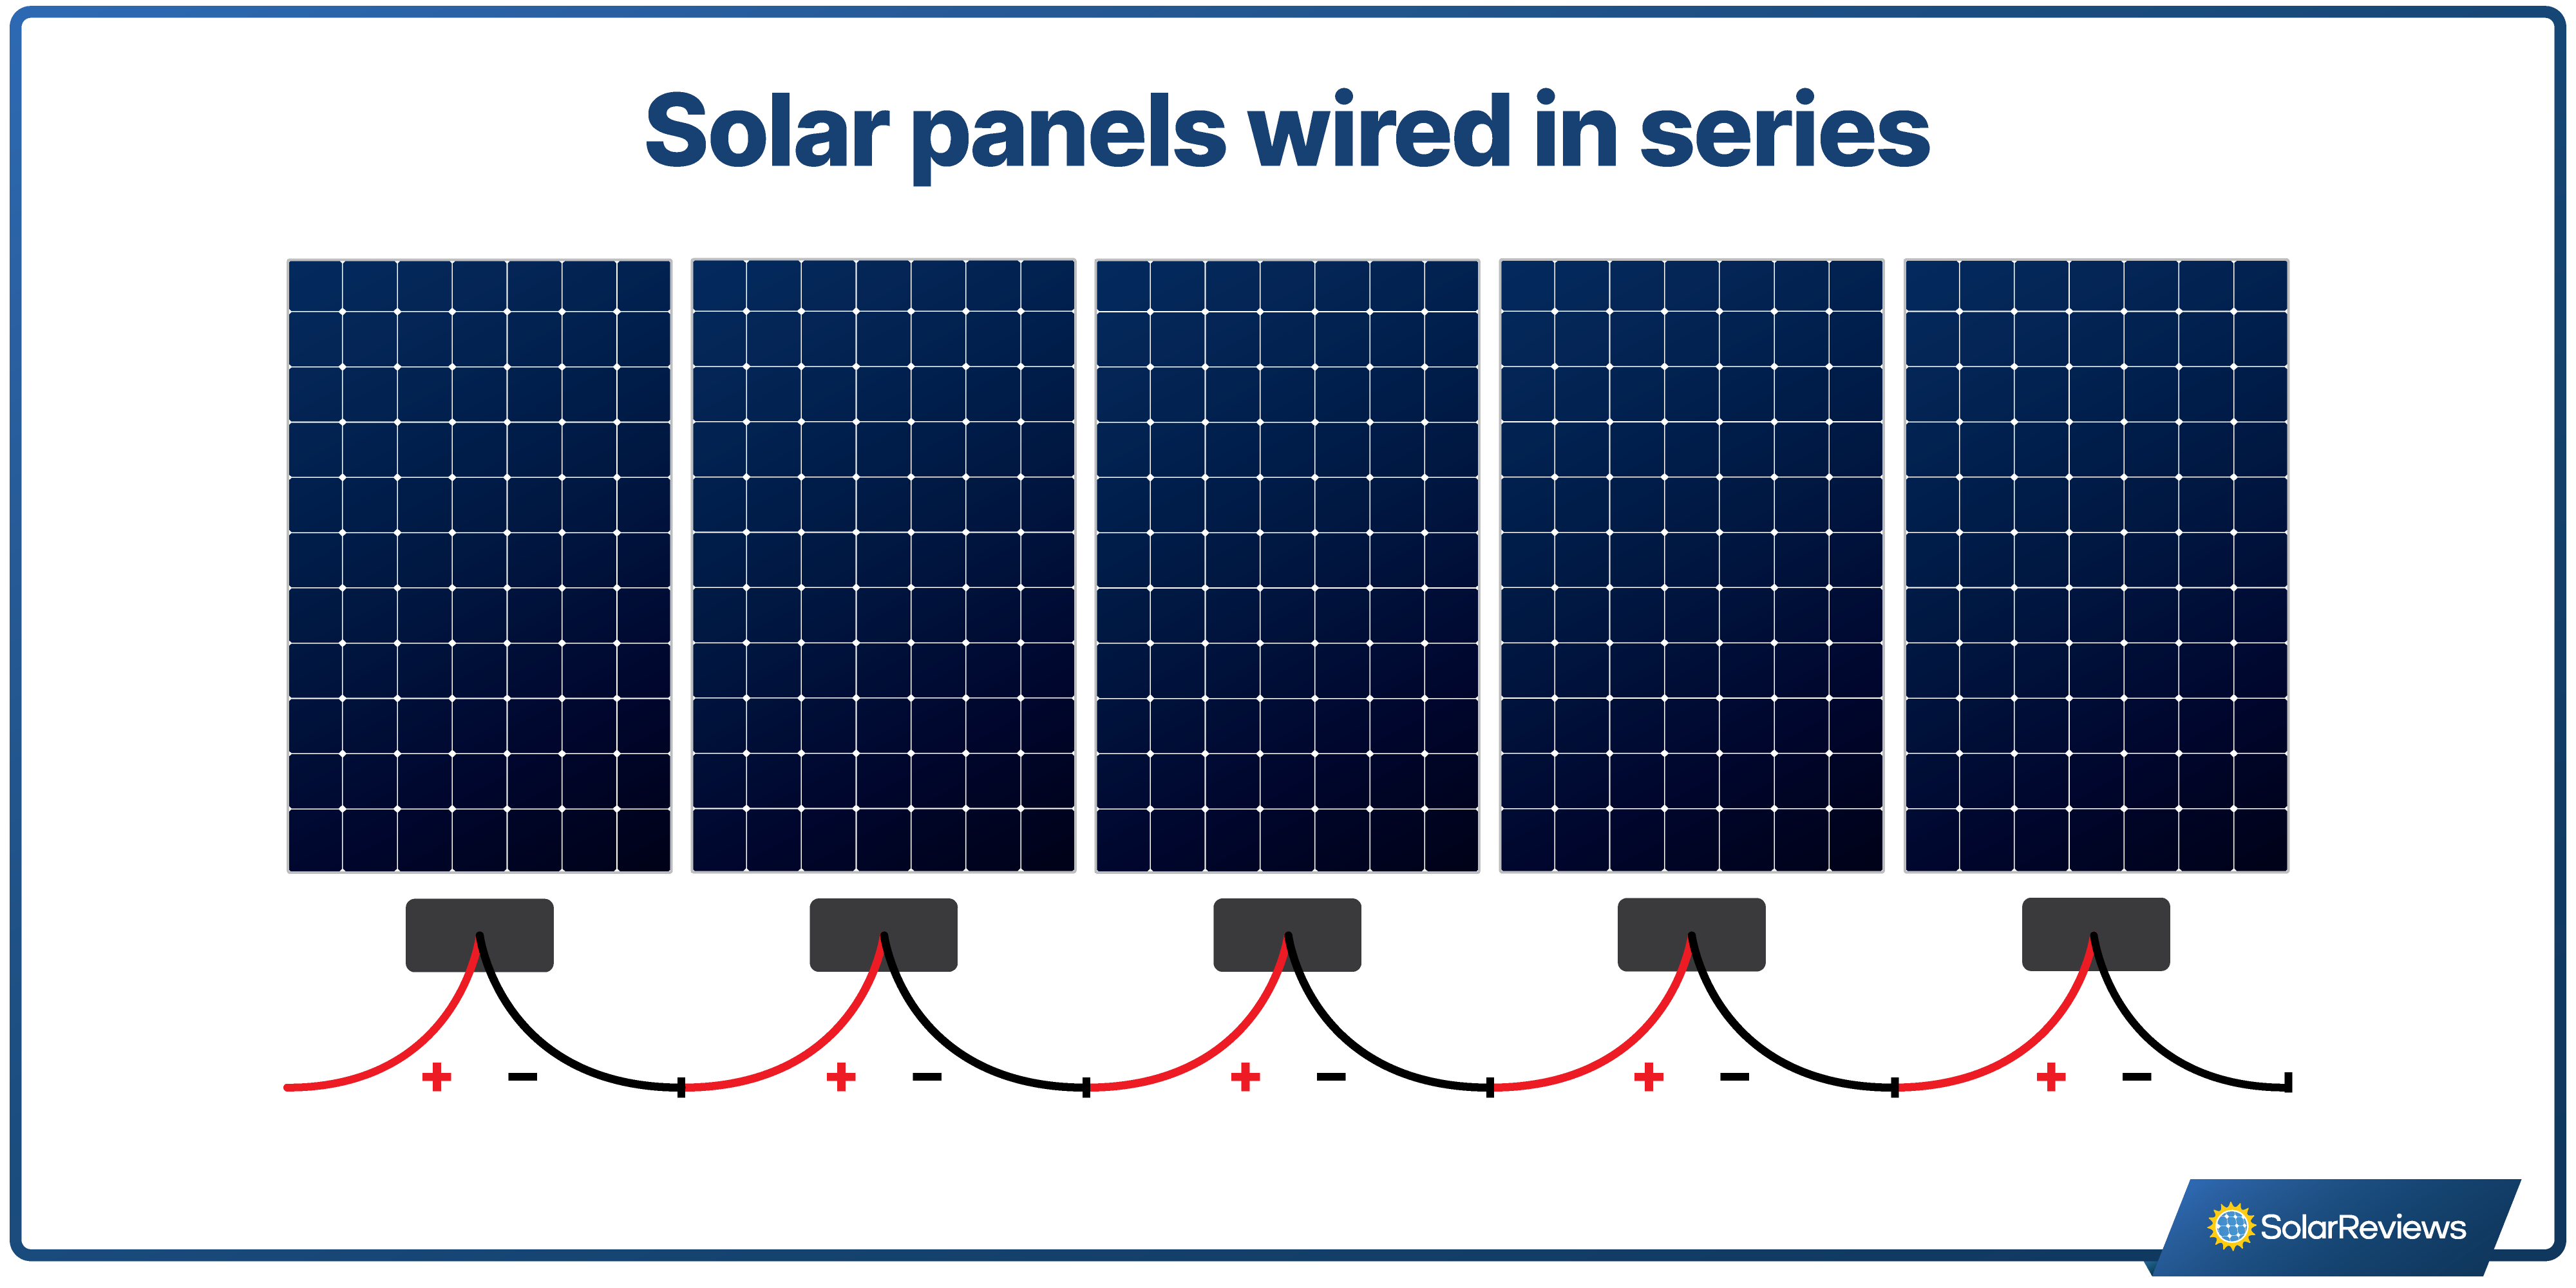
Series Wiring
In series, you connect the positive terminal of one panel to the negative terminal of the next. The voltage adds up, but the current stays the same.
- Example: If you have three 12V panels (5A each), series gives you 36V (12+12+12), still 5A.
- Pros: Good for high-voltage systems. Reduces power loss over long wires.
- Cons: If one panel fails, all others stop working.
Series wiring is best for systems where you want higher voltage. For example, many inverters require high voltage to work efficiently. Series wiring also helps when you need to run cables over a long distance because higher voltage means less energy lost in the wires.
Parallel Wiring
In parallel, you connect all positive terminals together, and all negative terminals together. The voltage stays the same, but the current adds up.
- Example: Three 12V panels (5A each) in parallel give you 12V, but 15A (5+5+5).
- Pros: If one panel fails, others keep working. Good for low-voltage, high-current systems.
- Cons: Needs thicker wires to handle high current.
Parallel wiring is often used for systems with batteries, like off-grid setups. It lets you keep the voltage low and increase the total current. This is useful for battery charging, but you must use thick wires because high current can overheat cables if they are too thin.
Mixed (series-parallel) Wiring
Sometimes, you combine both methods for bigger systems. This balances voltage and current. For example, you might connect two groups of panels in series, then join those groups in parallel. This lets you match your inverter and battery needs more easily.
Which Wiring Method Should You Use?
- If your inverter needs high voltage, use series.
- If your batteries need high current, use parallel.
- For large setups, mix both.
Non-obvious insight: Many beginners don’t check the voltage limits of their inverter. If your series voltage is too high, you can damage your inverter. Always check the maximum input voltage and current for your devices.
Another mistake is forgetting that shading affects panels in series more than in parallel. If one panel in a series string is shaded, all panels lose power. In parallel, shading affects only the shaded panel. So, think about where you will install your panels and how much shade they get during the day.
Tools And Materials You Need
Wiring solar panels needs the right tools and materials. Using poor quality parts can cause fires or make your system unreliable.
Essential Tools
- Wire cutters and strippers – For cutting and preparing wires.
- Multimeter – To check voltage, current, and continuity.
- Screwdrivers – Different sizes for terminal screws.
- Crimping tool – To attach connectors securely.
- Drill – For mounting and cable routing.
You may also need a heat gun for some connectors, cable ties for neat installation, and a level to check panel mounting angles. Having all your tools ready before you start makes the process much smoother.
Materials
- Solar cables – These are designed for outdoor use. UV-resistant and thick enough for your system’s current.
- MC4 connectors – Standard connectors for solar panels.
- Fuse or circuit breaker – Protects against overloads.
- Combiner box – Combines multiple strings of panels.
- Inverter – Converts DC to AC.
- Charge controller – Manages battery charging.
- Battery bank – Stores solar energy.
- Mounting hardware – Supports panels and cables.
You may also need junction boxes, conduit for cable protection, and grounding rods. These materials keep your system safe and make wiring last longer.
Practical tip: Buy extra connectors and cable. Mistakes happen, and running out of parts can delay your project.
Also, check that your cables are certified for your country’s electrical standards. Using non-certified materials can fail inspection and put your system at risk.
Credit: www.essentracomponents.com
Safety Steps Before Wiring
Solar wiring is not dangerous if you follow simple rules. Electrical mistakes can cause shocks or fires.
- Turn off all power before starting.
- Work in dry conditions. Water and electricity do not mix.
- Wear insulated gloves and safety glasses.
- Use tools with insulated handles.
- If unsure, ask a professional.
Many people don’t realize that even a single panel can produce enough voltage to shock you. If you touch a live wire, you can get hurt. Always double-check that no power is flowing before you start working.
Non-obvious insight: Even if the panels are not connected to the system, they produce electricity in sunlight. Cover the panels while wiring to prevent accidental shocks.
It’s also wise to keep a fire extinguisher nearby and never work alone. If something goes wrong, having someone else present can make a big difference.
Planning Your Solar Wiring Layout
A good wiring plan saves time and prevents problems. Sketch your layout before starting.
Key Steps
- Map your panels – Where will you mount them? How far from the inverter or batteries?
- Measure cable distances – Longer cables mean more resistance. Keep cables as short as possible.
- Check voltage and current needs – Write down the voltage and current from each panel.
- Decide on series, parallel, or mixed wiring – Based on your inverter and battery needs.
- Plan for future expansion – Leave space for more panels if you might add them later.
Planning also includes thinking about weather and environment. If your panels are on the roof, make sure you have a safe way to reach them. If your cables run underground, use waterproof conduit.
Common mistake: Beginners often use thin cables to save money. Thin cables get hot and waste energy. Always use the correct cable size.
Another mistake is forgetting about cable routing. Running cables across walkways or sharp edges can lead to damage. Plan your routes to avoid hazards.
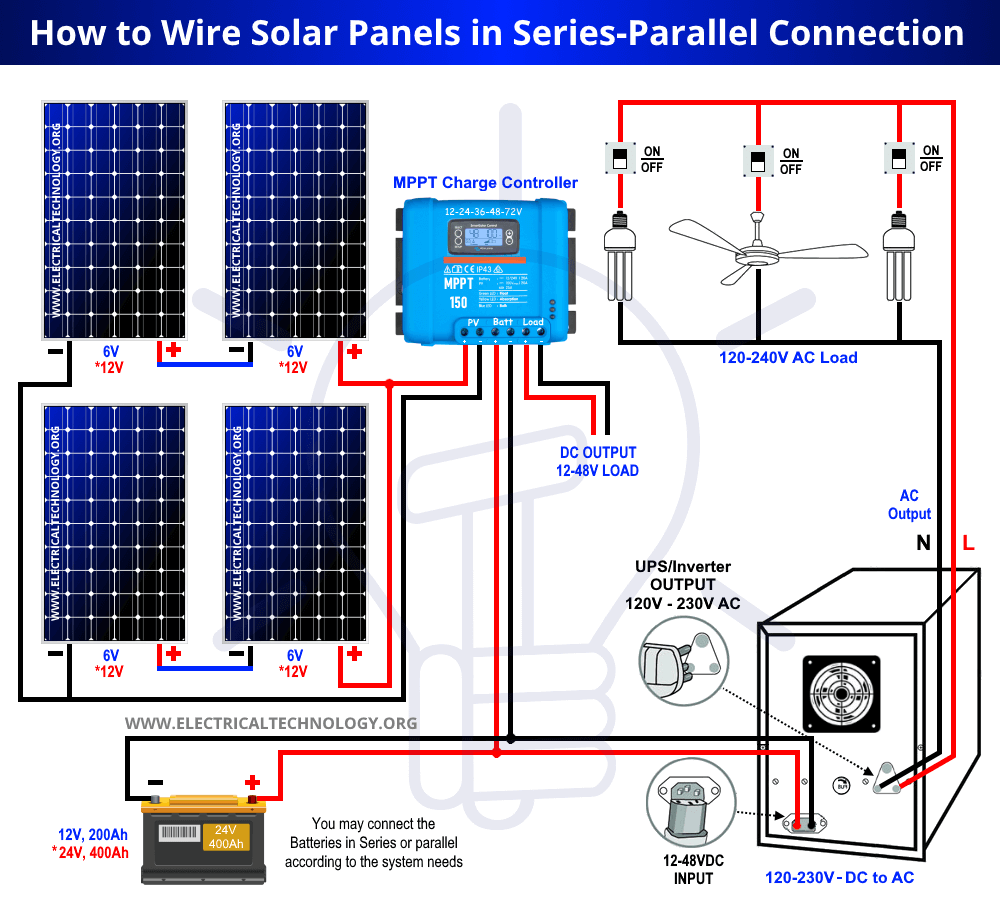
Credit: www.electricaltechnology.org
Step-by-step Guide: Wiring Solar Panels
Wiring solar panels involves several steps. Follow these steps for a safe and efficient setup.
1. Mount The Panels
Install the panels on your roof or ground mount. Make sure they face the sun and are secure.
- Tilt the panels for maximum sunlight (usually 30–40 degrees in most areas).
- Leave space between panels for cooling.
Check your mounting hardware before installation. Panels must be able to withstand strong winds and heavy rain. Use stainless steel bolts and brackets if possible.
2. Connect The Panels
Series Wiring Steps
- Connect the positive terminal of the first panel to the negative terminal of the second panel.
- Continue until all panels are connected.
- The end terminals will go to the next device (charge controller or combiner box).
Make sure all connections are tight. Loose connections cause resistance and heat, which can damage your panels.
Parallel Wiring Steps
- Connect all positive terminals together using a bus bar or cable.
- Connect all negative terminals together.
- Connect the combined cable to the next device.
Bus bars are metal strips that make parallel connections neat and reliable. Using them reduces the chance of loose wires.
Mixed Wiring Steps
- Group panels in series strings.
- Connect those strings in parallel.
Label each string so you know which panels are connected together. This helps with troubleshooting.
3. Install Mc4 Connectors
MC4 connectors make it easy to join cables safely.
- Strip the cable ends.
- Insert the wire into the connector.
- Crimp firmly to avoid loose connections.
Double-check that the connectors are fully clicked together. Water can cause corrosion if connectors are not sealed properly.
4. Run The Cables
Route cables from the panels to the combiner box or charge controller.
- Use cable clips to secure wires.
- Avoid sharp bends and keep cables away from hot surfaces.
If cables run outside, use conduit to protect them from animals and weather. Make sure cables are not exposed to direct sunlight for long periods.
5. Connect To The Combiner Box
If you have multiple panel strings, use a combiner box.
- Combiner boxes have fuses for each string.
- Connect each string’s positive and negative to the box.
- The box output goes to the charge controller.
Combiner boxes also help isolate problems. If one string fails, the others can keep working.
6. Connect To The Charge Controller
The charge controller protects your batteries.
- Connect the positive and negative from the combiner box to the controller’s input.
- Connect the controller’s output to the battery bank.
Make sure the controller is rated for your system’s voltage and current. Using the wrong controller can damage your batteries.
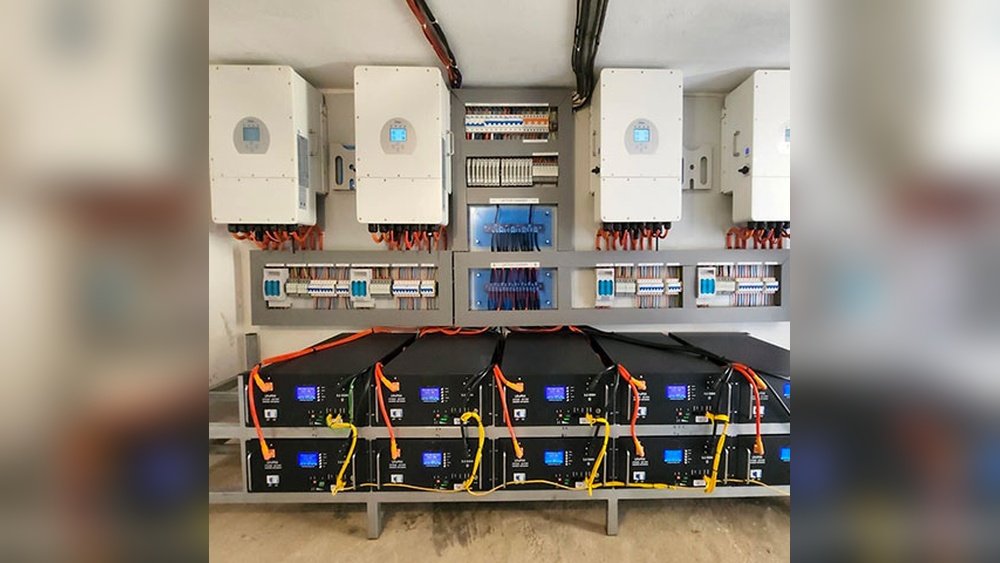
7. Connect To The Batteries
Batteries store your solar power.
- Use thick cables for battery connections.
- Add fuses close to the batteries for safety.
Install batteries in a cool, dry place. Heat and moisture reduce battery life.
8. Connect To The Inverter
The inverter turns DC into AC.
- Connect the battery output to the inverter input.
- The inverter output connects to your home’s AC system or appliances.
Mount the inverter where it has good airflow. Inverters can get hot during operation.
9. Test The System
- Use a multimeter to check voltage and current at each stage.
- Check for loose connections and hot spots.
- Make sure fuses and breakers work.
Start with small loads and increase slowly. This helps you spot any problems before they become serious.
Practical tip: Label all cables and connections. If you need to troubleshoot later, clear labels save time.
Use color-coded cables if possible. Red for positive, black for negative, and green for ground.
Choosing The Right Cable Size
Cable size is critical. Too thin, and you lose power or risk fire. Too thick, and you waste money.
How To Calculate Cable Size
- Check your panel current and voltage.
- Measure cable length.
- Use the formula:
Cable Size (mm²) = (Current × Distance × 2) / (Voltage Drop × 56)
- For solar, aim for voltage drop less than 3%.
Choosing the right cable also depends on the environment. If cables run through walls or outside, choose cables with extra insulation and UV protection.
Example Calculation
- Panels: 12V, 5A each, total cable length: 20m.
- Desired voltage drop: 0.36V (3% of 12V).
- Cable Size = (5 × 20 × 2) / (0.36 × 56) = 100 / 20.16 ≈ 5mm²
If you are not sure about your calculation, use an online cable size calculator. It can help you avoid mistakes.
Cable Size Comparison Table
Here is a quick comparison for common setups:
| System Current (A) | Cable Length (m) | Recommended Cable Size (mm²) |
|---|---|---|
| 5 | 10 | 2.5 |
| 10 | 20 | 4 |
| 15 | 30 | 6 |
| 20 | 40 | 10 |
Non-obvious insight: Always round up cable size if unsure. Small mistakes in cable size can cause big energy losses.
Also, remember that higher temperatures and multiple cables together may require larger cables. Check your local codes for guidance.
Protecting Your Solar System With Fuses And Breakers
Fuses and breakers protect against overloads. If too much current flows, they disconnect the circuit.
Where To Place Fuses And Breakers
- Between panels and charge controller.
- Between charge controller and batteries.
- Between batteries and inverter.
Fuses must be easy to access. If a fuse blows, you need to replace it quickly. Mount them in a dry area, away from dust and moisture.
Types Of Fuses
- Blade fuses – Easy to replace, used for low current.
- Cartridge fuses – For higher current.
- Circuit breakers – Can be reset, good for main lines.
Some systems use both fuses and breakers. Fuses protect small circuits, while breakers protect main lines.
Fuse Size Table
Here is a simple guide for fuse sizing:
| Panel Current (A) | Recommended Fuse (A) | Type |
|---|---|---|
| 5 | 8 | Blade |
| 10 | 15 | Cartridge |
| 20 | 25 | Circuit Breaker |
Practical tip: Never use a fuse that is too large. If the fuse is bigger than your cable or panel rating, it will not protect you.
Also, replace fuses with the same type and rating. Using the wrong fuse can cause more problems.
Wiring The Charge Controller
Charge controllers are critical for protecting batteries from overcharging.
Types Of Charge Controllers
- PWM (Pulse Width Modulation) – Cheap, simple, but less efficient.
- MPPT (Maximum Power Point Tracking) – More expensive, but up to 30% more efficient.
MPPT controllers adjust to match the best voltage and current for your panels. This boosts your system’s output, especially in cloudy conditions.
Wiring Steps
- Connect panel output to controller input.
- Connect controller output to battery.
- Connect controller load output to inverter or DC appliances.
Always follow the manufacturer’s instructions. Each controller may have special wiring rules.
Common mistake: Beginners often forget to connect the ground wire. Grounding protects against lightning and electrical faults.
Check that your controller is set for the right battery type (lead-acid, lithium, etc. ). Incorrect settings can damage batteries.
Wiring The Inverter
The inverter changes DC to AC. Wiring depends on your inverter’s type.
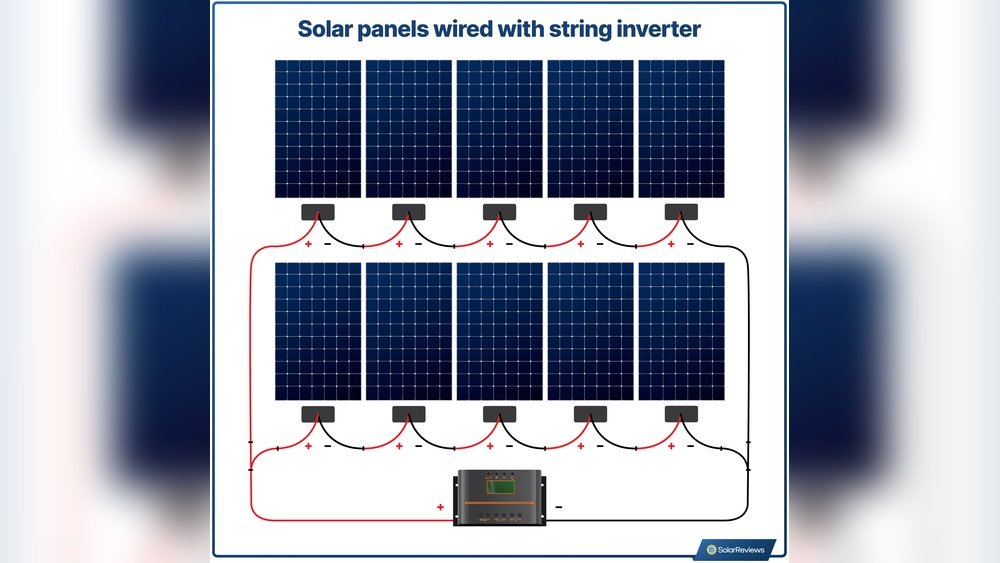
Types Of Inverters
- String inverters – For larger systems, connect all panels to one inverter.
- Microinverters – One inverter per panel, more flexible.
Microinverters are useful if you want to monitor each panel separately. They also reduce problems from shading.
Wiring Steps
- Connect battery output to inverter input.
- Connect inverter output to your AC system.
- Install a breaker between inverter and AC loads.
Use thick cables for inverter connections. Inverters can draw high current, especially during startup.
Non-obvious insight: Microinverters are more expensive but easier to wire. They also allow you to monitor each panel’s output.
Check your inverter’s manual for wiring diagrams. Some inverters require special connectors.
Grounding Your Solar System
Grounding is essential for safety. It protects against shocks and lightning.
How To Ground
- Connect a thick copper wire from the frame of each panel to a ground rod.
- Ground the inverter and charge controller.
- Check local electrical codes for grounding rules.
Ground rods must be buried deep enough to reach moist soil. Dry soil does not conduct electricity well.
Practical tip: Use anti-corrosion paste on ground connections. Corroded ground wires can fail during storms.
Also, inspect ground wires regularly. If you see rust or damage, replace them right away.
Connecting To The Electric Grid
Many systems connect to the grid. You can sell extra power or use grid backup.
Grid-tied System Steps
- Connect inverter output to your home’s main panel.
- Install a grid-tied meter to measure energy flow.
- Get approval from your utility company.
Grid-tied systems need special inverters that match the grid voltage and frequency. If you use the wrong inverter, you can cause problems for the whole neighborhood.
Common mistake: Never connect a solar system to the grid without proper approval. Unauthorized connections can cause legal and safety issues.
Utility companies may inspect your system before allowing grid connection. Make sure all wiring meets their standards.
Testing And Troubleshooting Your Wiring
Testing ensures your system works safely and efficiently.
Key Tests
- Use a multimeter to check voltage and current at each stage.
- Check for warm cables. Warm cables mean too much resistance.
- Check fuses and breakers.
- Monitor battery voltage during charging.
Testing should be done in daylight, but avoid working on live circuits. If you must test live wires, use insulated tools.
Common Problems And Solutions
- Low power output – Check for loose connections, shade on panels, or bad cable size.
- System shuts off – Check fuses and breakers, battery voltage, or inverter settings.
- Noise or sparks – Disconnect power immediately. Inspect all connections.
Sometimes, panels produce less power because of dirt or bird droppings. Clean panels regularly to keep output high.
Non-obvious insight: Solar panels can develop invisible cracks. If you notice a big drop in power, inspect panels for damage.
Using a thermal camera can help spot hot spots in wiring or panels.
Credit: www.solarreviews.com
Wiring Solar Panels For Different System Sizes
Solar systems come in many sizes. Each size needs a different wiring approach.
Small Systems (1–2 Panels)
- Use parallel wiring for flexibility.
- Simple controller and small batteries.
- Ideal for RVs, cabins, or small appliances.
Small systems often use plug-and-play kits. These are easier to wire and require less planning.
Medium Systems (3–10 Panels)
- Series or mixed wiring for higher voltage.
- Use a combiner box.
- Larger batteries and inverters.
Medium systems need more careful planning. You must balance voltage and current to match your devices.
Large Systems (10+ Panels)
- Mixed wiring to balance voltage and current.
- Multiple combiner boxes.
- Strong grounding and safety equipment.
Large systems often power whole homes or farms. You may need professional help for these setups.
System Size Comparison Table
Here is a quick reference for system sizes:
| System Size | Wiring Method | Recommended Inverter (kW) | Battery Bank (Ah) |
|---|---|---|---|
| Small (1–2 panels) | Parallel | 0.5–1 | 50–100 |
| Medium (3–10 panels) | Series/Mixed | 2–5 | 200–500 |
| Large (10+ panels) | Mixed | 5–10+ | 1000+ |
Wiring For Off-grid Vs Grid-tied Systems
Your wiring plan changes if you are off-grid or connected to the utility.
Off-grid Systems
- Must have batteries for storage.
- All power comes from solar or backup generator.
- Use a robust charge controller.
Off-grid systems need extra safety devices. If your batteries overheat, you can lose your power supply. Install temperature sensors to protect your batteries.
Grid-tied Systems
- No batteries needed.
- Connects directly to the grid.
- Needs grid-approved inverter.
Grid-tied systems are easier to wire, but you must follow strict codes and utility rules.
Practical tip: Off-grid systems need more safety checks. If your batteries fail, you lose all power.
Keep backup generators ready for emergencies in off-grid setups.
Monitoring And Maintaining Your Solar Wiring
Solar systems last 20+ years with good maintenance. Wiring needs regular checks.
Monitoring Tools
- Solar monitoring apps (many inverters have them).
- Battery voltage meters.
- Power output meters.
Some systems have alarms for low voltage or high temperature. These help you spot problems quickly.
Maintenance Steps
- Check cable insulation every year.
- Tighten all connections.
- Replace worn connectors.
- Clean panels for maximum sunlight.
Inspect panels for cracks, chips, or signs of wear. Damaged panels can cause shorts or reduce output.
Non-obvious insight: UV rays break down cable insulation over time. If you see cracks in cables, replace them immediately.
Also, check for animals chewing cables, especially in rural areas.
Advanced Wiring Techniques
Some advanced techniques can make your system better.
String Optimizers
Optimizers improve each panel’s output.
- Used with mixed wiring.
- Allows panels to work even if some are shaded.
String optimizers also make it easier to monitor each panel. You can spot problems faster and fix them before they affect your system.
Dc Busbars
Busbars distribute current safely.
- Used in large systems.
- Makes wiring neat and reduces resistance.
Busbars also make upgrades easier. You can add more panels without rewiring everything.
Rapid Shutdown Devices
Required in some areas for safety.
- Turns off panels quickly during emergencies.
- Protects firefighters and maintenance workers.
Rapid shutdown is important if you install panels on a roof. Firefighters need to know that power can be shut off instantly.
Practical tip: If you plan to expand your system later, use busbars and optimizers now. Upgrades become easier.
Real-life Examples And Case Studies
Let’s look at some real examples to see how wiring works.
Example 1: Small Cabin System
- 2 × 100W panels (12V, 8A each).
- Parallel wiring for 12V, 16A total.
- Simple charge controller and 100Ah battery.
- Used for lights and phone charging.
This system uses short cables and small fuses. It is easy to install and maintain.
Example 2: Medium Home System
- 8 × 250W panels (24V, 10A each).
- Series-parallel wiring: 2 strings of 4 panels.
- Combiner box, MPPT controller, 500Ah battery, 5kW inverter.
- Powers lights, fridge, and electronics.
The combiner box helps isolate each string for easy troubleshooting.
Example 3: Large Farm System
- 30 × 350W panels (48V, 7A each).
- Mixed wiring: 3 strings of 10 panels.
- Advanced combiner box, DC busbars, optimizers, rapid shutdown devices.
- Grid-tied and off-grid backup.
The farm system uses extra grounding and surge protection because lightning is common in rural areas.
Non-obvious insight: Farms often use solar for pumps and machines. Mixed wiring helps balance high power needs.
Also, large systems need special software to track power output and spot failures.
Permits, Codes, And Legal Requirements
Solar wiring must meet local codes and laws.
- Check your local electrical code.
- Get all required permits before starting.
- Inspections are often mandatory.
Permits ensure your system is safe and legal. Not having permits can cause fines or problems with insurance.
Key Rules
- Use certified equipment.
- Panels and wiring must be installed by qualified workers (in many areas).
- Grounding and rapid shutdown rules can vary.
Codes may require special labeling for wires and panels. Always check your local requirements before starting.
Practical tip: Permits may take weeks. Start the permit process early to avoid delays.
The Importance Of Professional Help
Even if you plan to do-it-yourself, some parts need expert help.
- Complex systems (10+ panels) should be checked by an electrician.
- Grid-tied systems must be approved by your utility.
- Inverters and main AC wiring need professional installation.
Professional help also ensures your system is safe and meets all codes. If you plan to sell your home, professional installation can raise its value.
Non-obvious insight: Many insurance companies require proof of professional installation for coverage.
How Solar Panel Wiring Affects Performance
The way you wire affects how much power you get.
- Long cables waste energy.
- Bad connections cause power loss.
- Wrong fuse sizes reduce safety.
If your wiring is messy, it’s harder to find and fix problems. Neat wiring saves time and keeps your system safe.
Performance Comparison
Well-wired systems can be up to 20% more efficient than poorly wired systems.
If you notice your system isn’t producing expected power, check wiring first. Most problems are caused by loose connections or wrong cable sizes.
Practical tip: If your system is not producing the expected power, check wiring first. Most problems come from wiring mistakes.
Upgrading And Expanding Your Solar System
Solar systems can grow. Plan your wiring for upgrades.
- Use bigger combiner boxes and busbars.
- Leave space for extra panels.
- Plan for bigger batteries and inverters.
If you want to add more panels, make sure your cables and fuses can handle the extra current.
Non-obvious insight: Expansion is easier if you use modular components. Don’t lock yourself into one wiring method.
Also, keep a record of your wiring plan. It helps when you upgrade or repair your system.
Frequently Asked Questions
What Is The Best Way To Wire Solar Panels For Maximum Power?
The best wiring method depends on your system size and devices. For high voltage, use series wiring. For high current, use parallel. Large systems often use mixed wiring. Always check your inverter and battery specs before deciding.
How Do I Know What Cable Size To Use For My Solar Panels?
Calculate cable size based on panel current, cable length, and voltage drop. Aim for less than 3% voltage drop. Use the formula in this article or check online calculators. When unsure, choose a thicker cable for safety.
Do I Need A Fuse For Each Solar Panel?
Yes, each string of panels should have a fuse or breaker. Fuses protect against overloads or short circuits. Pick a fuse size that is slightly higher than your panel’s current rating, but not too high.
Can I Wire Different Solar Panel Brands Together?
It’s possible, but not recommended. Different brands may have different voltage and current ratings. Mixing panels can reduce efficiency and cause problems for your inverter or charge controller.
How Often Should I Check My Solar Wiring?
Check all wiring at least once a year. Look for loose connections, cracked insulation, and signs of overheating. If you see any problems, fix them right away. Regular checks keep your system safe and efficient.
Solar power is a smart investment. Wiring your solar panels the right way is the foundation for good performance and safety. Take your time, plan carefully, and always follow the steps in this guide. If you are ever unsure, ask a professional. With the right wiring, your system will give you clean energy for years. For more in-depth technical details, you can visit Wikipedia. Good luck with your solar project—your future is brighter with solar power!