Using a 435W solar panel on your RV sounds like a big leap from the usual 100W or 200W panels most travelers know. But as more people want to camp off-grid, run bigger appliances, or just enjoy more comfort, larger panels like 435W are becoming popular. If you’re thinking about this upgrade, you probably have questions: Will it fit? Is it safe? Can your RV handle that much power? Let’s break it down so you get clear answers, avoid costly mistakes, and make the right decision for your travel style.
What Makes A 435w Solar Panel Different?
Most standard RV solar setups use smaller panels—usually between 100W and 200W. So why do people consider a 435W solar panel?
- Higher power output means you can run more devices, like a fridge, laptop, or even a microwave, without draining your batteries quickly.
- Fewer panels needed: Instead of covering your roof with four or five small panels, one or two large panels can do the same job.
- Advanced technology: Many 435W panels use half-cell or shingled cell designs, which are more efficient and durable.
The jump in size and power brings new challenges. These panels are physically bigger, heavier, and sometimes require different electrical components. There’s also the question of whether your RV’s electrical system can handle the higher wattage and voltage. While the idea of a bigger panel seems simple, the details matter.
For example, the way these panels are built often means they handle partial shading better than old panels, but if a large part is shaded, you lose more total power.
Another detail: 435W panels are often made for homes or commercial buildings, not RVs. That means they may have different connectors, require different mounting hardware, and sometimes need special handling during installation. If you’re upgrading, be prepared to learn about these differences.
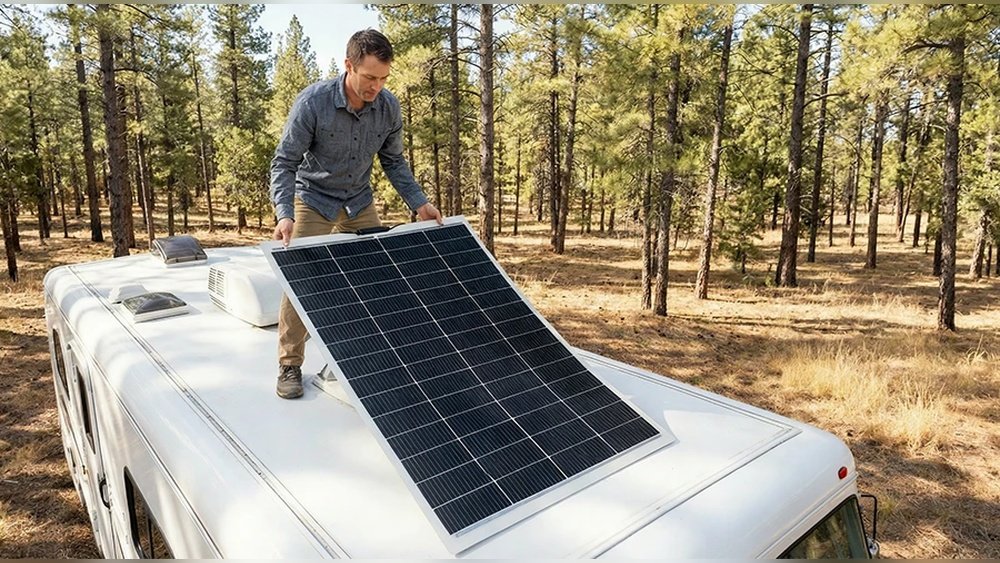
Physical Size And Weight: Will It Fit On Your Rv?
The first question is always space. RV roofs are not large and often have vents, air conditioners, or antennas. A typical 435W panel is much larger than a 100W panel.
| Panel Wattage | Typical Size (inches) | Weight (lbs) |
|---|---|---|
| 100W | 42 x 20 | 15 |
| 200W | 58 x 26 | 28 |
| 435W | 79 x 40 | 50 |
A 435W panel is almost 7 feet long and over 3 feet wide. You need a clear, flat space free of obstructions. Measure your RV’s roof carefully, including space for mounting brackets and airflow underneath the panel. Don’t forget that mounting brackets often add extra width and height, and you need to leave room for maintenance, like cleaning or checking wiring.
Weight is another issue. At 50 pounds or more, a 435W panel is heavy. Most RV roofs can handle the weight, but if your roof is older or uses thin materials, check with your RV manufacturer. Improper installation can cause leaks, sagging, or even structural damage.
If you have a fiberglass roof, check for flex before installing. For aluminum roofs, make sure you use corrosion-resistant hardware. Some older RVs have wooden roofs, which can weaken over time. Always check for soft spots before installing any heavy panel.
Extra tip: It’s helpful to ask a friend to help with lifting and positioning the panel. Trying to move a 50-pound panel alone can cause accidents or roof damage.
Voltage And Compatibility With Rv Systems
Large solar panels often use higher voltages than smaller ones. Many 435W panels are designed for residential or commercial use, running at 36V or even 48V. Standard RV systems usually use 12V or 24V.
Why Voltage Matters
- Mismatch: If your panel’s voltage is much higher than your batteries, your charge controller must handle the difference, or you risk damaging your system.
- Efficiency: Higher voltage panels lose less power over long cable runs, which can be a plus for larger RVs.
Before buying, check the panel’s Voc (open circuit voltage) and Vmp (voltage at maximum power). Then, match it with a compatible charge controller. Higher voltage panels can be more efficient, but if the controller isn’t rated for the voltage, it might shut down or even fail.
Another thing beginners miss: Using a high-voltage panel with a low-voltage battery without an MPPT controller will waste power and can damage both the panel and battery. Always read the specs before you buy.
Mppt Vs Pwm Charge Controllers
Most 435W panels require an MPPT (Maximum Power Point Tracking) charge controller. Unlike simple PWM controllers, MPPT units convert higher voltages down to your battery’s voltage, making them ideal for big panels.
- MPPT controllers are more expensive but much more efficient, especially with high-voltage panels.
- PWM controllers often can’t handle the voltage or current from a 435W panel, so they are usually not recommended for this setup.
If your RV currently uses a PWM controller, plan to upgrade. Also, check the amp rating of your MPPT controller. For a 435W panel, you need a controller rated for at least 35–40A to handle peak current.
Extra example: If your panel has a Vmp of 41V and your battery bank is 12V, an MPPT controller will convert the extra voltage into more current, maximizing your charging efficiency. With a PWM controller, you could lose over 30% of your solar energy.
Can Your Batteries Handle 435w Panels?
Solar panels work best when matched with a battery bank that can store and use the energy they produce. A single 435W panel can generate about 1.7 kWh per day in good sun (assuming 4 peak sunlight hours).
Battery Sizing
To use this energy, your battery bank should be large enough to avoid overcharging and small enough to charge fully each day.
- Lead-acid batteries: Need a minimum of 200Ah (at 12V) to safely store a day’s output from one 435W panel.
- Lithium batteries: More efficient and can handle deeper discharges, so you can get by with less, but 150Ah is still a safe minimum.
If you have a small battery bank (under 100Ah), a 435W panel will often produce more power than you can store, wasting energy. Overcharging can also reduce battery life, especially with lead-acid types.
Example: If you camp in the sun for 5 hours and your panel makes 2 kWh, but your battery is only 100Ah (about 1.2 kWh at 12V), extra energy has nowhere to go. Your controller will cut off charging, and you lose the extra solar power.
Charging Speed
A 435W panel can recharge a 200Ah battery bank from 50% to full in about 4 hours of strong sun. This is great for heavy users but can be overkill for weekend campers who only run lights and charge phones.
Extra tip: If you use your RV for long trips or park in cloudy areas, a bigger battery bank lets you store extra energy for rainy days.
Common mistake: Beginners sometimes buy a big panel but forget to upgrade their batteries. If your batteries are too small, you won’t get the full benefit of the solar power.
Credit: www.amazon.com
Installation: What Changes With Big Panels?
Putting a large panel on your RV is not just a bigger version of a small panel install. There are a few unique challenges:
Mounting Considerations
- Wind load: Large panels catch more wind, especially at highway speeds or during storms. Use strong mounts and secure every corner.
- Roof strength: Reinforce mounting points if your roof feels flexible.
- Cable entry: Large panels use thicker wires. Plan the cable route and entry points to avoid leaks.
For big panels, you may need extra brackets or backing plates inside the RV ceiling. Always use stainless steel hardware to prevent rust. Seal all holes with a good RV roof sealant to prevent leaks.
Extra example: Some RVers use low-profile mounts to reduce wind resistance. Others use tilt mounts for better sun exposure in winter, but these add complexity and height.
Wiring And Connectors
- Thicker wires: High-wattage panels need bigger cables to handle more current and reduce voltage loss.
- MC4 connectors: Most large panels use these. If your RV uses old-style connectors, you’ll need adapters.
- Fusing: Add fuses or circuit breakers rated for the higher current, close to the battery for safety.
With thick wires, make sure to route cables away from sharp edges or moving parts. Use wire clamps and protective sleeves. If you run wires through walls or under flooring, add protection from vibration.
Beginner tip: Don’t mix wire sizes. Use the same gauge from panel to controller, and controller to battery, to keep your system safe.
Series Vs Parallel Wiring
If you plan to use multiple panels, decide between series (higher voltage) or parallel (higher current) wiring. MPPT controllers work well with series wiring, but make sure your charge controller’s voltage rating is not exceeded.
Extra detail: Series wiring is good for longer cable runs (less voltage drop), but shading on one panel affects the whole string. Parallel wiring is better for shade resistance but needs thicker wires.
Matching A 435w Panel To Your Power Needs
Not everyone needs this much solar. Will it make sense for you? Let’s look at some common RV usage profiles.
Light Users
- Run LED lights, charge phones, maybe a fan
- Typical daily use: Under 500Wh
- A 435W panel is overkill—unless you camp in shade often or want to charge fast after cloudy days.
Extra note: For these users, the extra power means your batteries charge quickly, so you don’t have to worry about cloudy weather or short winter days. But the cost and space may not be worth it.
Moderate Users
- Use a 12V fridge, water pump, laptop, and small TV
- Daily use: 800–1200Wh
- A 435W panel can cover your needs, even with a few cloudy days.
If you like to use your RV several days in a row and run a fridge constantly, a big panel makes life easier. You can also charge other devices like tablets, cameras, or even power small tools.
Heavy Users
- Run an inverter for a coffee maker, microwave, or air conditioner (part-time)
- Use power tools, medical devices, or work remotely
- Daily use: 1500Wh and above
- A 435W panel is a good choice but may not be enough alone for heavy AC loads.
Extra insight: If you use your RV for remote work, you’ll need reliable power all day. A big panel gives you peace of mind. But for air conditioners, even a 435W panel is just part of the solution—you’ll need a large battery bank and possibly more panels.
Non-obvious insight: If you plan to expand your system in the future, starting with a large panel and MPPT controller gives you flexibility. Many users regret starting with small panels and having to rewire later.
Pros And Cons Of 435w Solar Panels On Rvs
Every choice has trade-offs. Here’s how 435W panels stack up for RV use.
Advantages
- More power, less roof space: Great for small roofs where you want maximum energy per square foot.
- Higher efficiency: Modern panels convert more sunlight to energy, so you get more out of each hour of sun.
- Less wiring and mounting: One or two big panels mean fewer holes in your roof and less wiring to manage.
- Simple upgrades: If you want to add more panels later, starting with a high-capacity controller and big panel makes expansion easier.
Disadvantages
- Size and weight: Harder to fit, heavier to lift, and more challenging to mount safely.
- High voltage: Not always compatible with basic RV solar equipment.
- Shading: If one corner is shaded by an air conditioner or vent, you lose more power compared to smaller panels wired in parallel.
- Cost: While $/watt can be lower, the upfront cost is often higher, especially when upgrading charge controllers.
- Difficult repairs: If a large panel fails, you lose more total power versus if a small panel fails in a multi-panel setup.
Non-obvious insight: Shade affects large panels more. If your RV roof has many objects that cast shadows, several smaller panels wired in parallel may outperform one big panel.
Step-by-step Guide: Installing A 435w Panel On Your Rv
If you’re ready to go big, here’s a practical guide to what’s involved.
1. Measure Your Roof And Plan The Layout
- Find a flat, open area at least 80 x 40 inches.
- Check for obstructions: Vents, skylights, antennas.
- Plan space for mounting brackets (usually add 2–3 inches on each side).
- Consider future additions—leave space for other panels or roof boxes.
2. Check Roof Strength And Reinforce If Needed
- Walk on the roof (carefully) and check for soft spots.
- If in doubt, add backing plates under mounting points inside the RV.
- Ask your RV manufacturer for roof load specs if you’re unsure.
3. Buy The Right Charge Controller
- Check the panel’s Voc (usually 40–50V for a 435W panel).
- Choose an MPPT controller rated for at least 40A and higher voltage than your panel’s Voc.
- Make sure the controller has room for expansion if you add more panels later.
4. Size The Wiring
- Use a wire size calculator (many are free online).
- For a 435W panel, 10 AWG or even 8 AWG wire is often needed, depending on cable length.
- Use high-quality wire insulation for RV environments (heat, vibration, moisture).
5. Install Mounts And Panel
- Use stainless steel hardware and seal all holes with RV-grade sealant.
- Bolt the panel securely and double-check tightness after your first drive.
- If using tilt mounts, make sure the panel is locked down before driving.
6. Connect Wires And Test
- Connect MC4 connectors, route wires through a gland or waterproof entry box.
- Attach fuses or breakers close to the battery.
- Test voltage at the charge controller before connecting to batteries.
- Check for correct polarity—reverse wiring can damage your controller.
7. Monitor Performance
- Use your charge controller’s display or a dedicated monitor.
- Check for overheating wires or loose connections after a few hours of use.
- Monitor battery voltage during charging to spot any issues early.
Extra tip: After the first week, recheck all bolts and wire clamps. Vibration from driving can loosen mounts and connections.
Common Mistakes To Avoid
Many RV owners upgrading to a 435W panel repeat the same errors. Learn from their experiences:
- Ignoring panel voltage: Buying a panel that your controller cannot handle.
- Overloading roof: Not reinforcing mounting points for heavy panels.
- Using too-small wires: This causes voltage drop and can even melt insulation.
- Skipping fuses: A short circuit without fuses can cause a fire.
- Not planning for shade: Installing a big panel where it gets shaded half the day.
Extra mistake: Not checking local regulations. Some campgrounds or RV parks require proof of safe installation, especially for big panels.
If you avoid these, your system will run safely and efficiently.
How To Choose A Quality 435w Solar Panel
Not all panels are the same. Here’s what matters when picking a 435W model for your RV:
- Panel type: Look for monocrystalline panels. They are more efficient and last longer than polycrystalline.
- Durability: Choose panels with a strong aluminum frame and tempered glass. RV travel is hard on equipment.
- Warranty: Good panels offer at least 10 years on workmanship and 25 years on output.
- Certification: Look for panels with UL, IEC, or TUV certifications.
- Trusted brands: Companies like LG, REC, or Canadian Solar make reliable panels. Avoid cheap, unbranded imports.
- Connector type: Make sure the panel uses MC4 connectors or comes with adapters for your RV system.
- Weather resistance: Panels rated for snow and wind loads last longer on the road.
Extra tip: Read user reviews before buying. Some panels are marketed as “RV ready,” but may not have the durability you need.
Real-world Example: A 435w Panel In Action
Let’s look at a real RV owner’s experience:
Sarah owns a 25-foot travel trailer. She switched from four 100W panels to a single 435W panel and upgraded to a Victron MPPT controller. Here’s what she found:
- Space saved: She removed three panels, freeing up space for a roof box.
- More power: On sunny days, her batteries (200Ah lithium) charge by noon, even when using a 12V fridge and working remotely.
- Shade issues: When parked under a tree, output drops more than before, since the single panel has no “backup” from other panels in the sun.
- Wind: She had to reinforce mounts after noticing the panel “lift” in gusty weather.
- Maintenance: Cleaning was easier with one panel, but checking for loose mounts took more time because the larger panel moved more.
Sarah says she would do it again, but only because her roof had a perfect open spot and she wanted to minimize wiring and maintenance.
Extra detail: Sarah noticed that after several months, the single large panel made it easier to spot dirt and keep clean, but she also had to check the mounting bolts more often due to vibration from driving.
Comparing 435w Panels With Smaller Rv Solar Panels
How do big panels compare to smaller ones often used in RVs? Here’s a direct look:
| Feature | 435W Panel | 2 x 200W Panels | 4 x 100W Panels |
|---|---|---|---|
| Roof space needed | ~22 sq ft | ~28 sq ft | ~24 sq ft |
| Weight | 50 lbs | 56 lbs | 60 lbs |
| Wiring complexity | Low | Medium | High |
| Shade resistance | Low | Medium | High |
| Initial cost | Higher | Medium | Lower |
If your roof is open and you want simple wiring, a 435W panel is hard to beat. If you camp under trees or want shade resistance, several small panels may be better.
Extra insight: If you travel with pets or family and often run appliances, the large panel is more convenient. If you camp in forests, the smaller panels wired in parallel will let you get power even when part of the roof is shaded.

Credit: www.amazon.com
Can You Run An Air Conditioner With A 435w Panel?
One of the most common questions. RV air conditioners use a lot of power—often 1,000W or more. A 435W panel cannot run an AC unit directly unless you have a large battery bank and inverter.
- Short answer: You can top up your batteries, but don’t expect to run AC for hours just from solar.
- Practical use: Use solar to keep your batteries charged for lights, fans, and appliances. Run the air conditioner only when plugged into shore power or using a generator.
Pro tip: If you want to run heavy loads, consider adding more panels and batteries or using a hybrid system with solar and generator backup.
Extra detail: Running the AC for 1 hour might use more than your panel produces in a day. For short bursts (like cooling the RV before bed), solar can help recharge batteries, but you need careful energy planning.
Cost Breakdown: What To Budget For
Switching to a 435W panel isn’t just buying the panel. Here’s a realistic budget:
- 435W panel: $300–$500 (higher quality costs more)
- MPPT charge controller: $150–$350
- Wiring and fuses: $50–$100
- Mounting hardware: $50–$80
- Installation (if hired out): $300–$800
Total cost: $550–$1,800 depending on DIY vs. professional install, brand, and system upgrades.
Hidden cost: If your RV’s electrical system is outdated, you may need to upgrade batteries or add a battery monitor for safety.
Extra example: If you upgrade from a PWM controller to an MPPT, you might also need new wiring, connectors, and possibly a new fuse box. Factor these costs into your budget to avoid surprises.

Credit: signaturesolar.com
Maintenance And Longevity
Large panels need little maintenance, but there are a few tips:
- Check mounts and wiring every few months, especially after rough roads.
- Clean the panel with water and a soft brush every few weeks. Dirt and pollen can cut output by 10% or more.
- Monitor for cracks in the glass or frame after hail or tree impacts.
Good panels last over 25 years with proper care. If you park in salty environments (near the ocean), wash panels more often to prevent corrosion.
Extra tip: During winter, snow and ice can build up. Always clear panels before charging—frozen panels can lower output and damage cells.
When Not To Use A 435w Panel On Your Rv
This setup is not for everyone. Avoid using a 435W panel if:
- Your roof is crowded: Too many vents or antennas make installation risky.
- You only camp on weekends: A smaller, cheaper setup is enough.
- You want maximum shade resistance: Multiple small panels wired in parallel are better.
- You’re on a tight budget: The upfront cost is higher, especially if you need to upgrade other components.
- You move your RV often: Large panels can be damaged in low-clearance areas or during frequent moves.
Extra detail: If you plan to sell your RV soon, a big panel may not add much resale value unless the new buyer wants high-power solar.
Alternatives To 435w Panels
If a big panel won’t work, here are some options:
- Multiple smaller panels: Easier to fit around roof obstructions. You can add more later if needed.
- Portable suitcase panels: Set these on the ground and move them to follow the sun or avoid shade.
- Flexible panels: Lightweight and conform to curved roofs, but usually less durable and lower output.
- Add-on solar generators: These combine batteries and panels for portable power and can be used outside the RV.
Each option has trade-offs, but all can work well for RV use.
Extra tip: Portable panels are handy if you park in shade but have sunny spots nearby. You can move them during the day for maximum output.
Future-proofing Your Rv Solar System
Solar technology is always improving. If you’re investing in a 435W panel now, think ahead:
- Use an MPPT controller that can handle extra voltage/current if you add more panels later.
- Oversize wiring: Run thicker cables than you need today, so you don’t have to rewire for future upgrades.
- Modular mounts: Choose mounts that allow you to swap panels as technology improves.
- Battery monitor: Install a monitor now, so you can track energy use and see if you need more panels or batteries later.
This way, your investment lasts longer and adapts to new needs.
Extra insight: If new solar panels get more efficient in the next few years, having modular mounts and wiring lets you upgrade without removing your entire roof setup.
Environmental Impact
Switching to a large solar panel is not just about convenience. A 435W panel can save hundreds of gallons of generator fuel per year, reduce noise, and lower your camping costs. Over 25 years, one panel can offset more than 10 tons of CO2 compared to generator use.
If you camp often, this is a meaningful way to reduce your environmental footprint. You also avoid the smell and pollution from burning propane or diesel, which can disturb wildlife and other campers.
Extra example: Many national parks now encourage solar for campers, and some even offer incentives for RVs with solar systems.
Legal And Warranty Issues
Some RV manufacturers warn that adding large panels can void roof warranties if not installed properly. Before drilling holes or adding weight, check your owner’s manual or call the dealer.
- Use approved sealants to avoid leaks.
- Document your install with photos and keep receipts for parts and labor.
- Ask about roof load limits before installing heavy panels.
This protects your investment and resale value. If you sell your RV, having proper records makes buyers more confident.
Extra tip: If you plan to use your RV in extreme climates, check warranty terms for damage from heat, cold, or hail.
Summary: Is A 435w Panel Right For You?
Using a 435W solar panel on your RV is possible and, for the right user, a smart choice. You get more power in less space, simplify wiring, and can run more devices off-grid. But you must plan carefully: check roof space, upgrade your charge controller, size your wiring, and match your battery bank.
If you need high output for remote work, long trips, or heavy appliances, a 435W panel makes sense. For light users, it’s often overkill. Always check compatibility with your RV’s systems and think about how shade, weight, and cost fit your goals.
For more technical details about solar panel efficiency and types, the Wikipedia Solar Panel page is a helpful resource.
Frequently Asked Questions
Can I Use A 435w Solar Panel With A 12v Battery System?
Yes, but you need an MPPT charge controller that can handle the high voltage (usually 40–50V) and convert it safely to charge your 12V batteries. Never connect a high-voltage panel directly to a 12V battery.
Extra tip: Make sure your wiring and fuses are rated for the higher current. An undersized wire can overheat and cause problems.
Is It Safe To Mount A 435w Panel On Any Rv Roof?
It depends on your roof’s strength. Most newer RVs can handle the weight, but older or lightweight models may need reinforcement. Always check your roof’s load rating and use proper mounting hardware.
Extra example: After installation, check for leaks and loose mounts every few weeks. Roof flexing can loosen bolts over time.
Will A 435w Panel Run My Rv Air Conditioner?
Not directly. RV air conditioners use more power than a single panel can provide in real time. You can use the panel to charge batteries, which can power the AC for short periods through an inverter, but extended use requires more panels and a large battery bank.
Extra insight: If you want to use your AC for several hours, plan for at least 2,000W of solar plus a big battery bank.
What Happens If Part Of My 435w Panel Is Shaded?
Shading on even a small part of a large panel can reduce its output by 50% or more. If your roof has lots of obstructions, multiple smaller panels may work better in partial shade.
Extra tip: Consider installing a panel monitoring system. It will show if shading is reducing power, so you can park or adjust as needed.
Can I Add More Panels Later If I Start With A 435w Panel?
Yes, but plan ahead. Use an MPPT controller rated for higher voltage and current so you can expand your system. Make sure your roof has space and your wiring can handle the extra load.
Extra tip: If you add panels, wire them in series or parallel depending on your controller’s specs for best performance.
Choosing a 435W solar panel for your RV is a big step, but with careful planning, it can be a powerful upgrade that keeps you comfortable and independent on the road.