Many homeowners today are drawn to solar energy for two main reasons: saving money and helping the environment. But one big question often comes up—how long does it take to install solar panels? If you’re considering solar, knowing the timeline helps you plan your budget, daily life, and expectations. The process involves more than just putting panels on your roof. There are steps before, during, and after installation that can affect the total time. Some people are surprised to learn that the actual installation is often the shortest part!
This guide gives you a complete, clear look at every stage of solar panel installation. You’ll discover what really happens, how long each part usually takes, and what can make things go faster or slower. Whether you want solar for your home or business, you’ll find practical advice, expert tips, and answers to common questions.
By the end, you’ll understand not only the typical timeline but also how to avoid delays and make smart decisions at every step.
The Complete Timeline: From First Call To Solar Power
You might think installing solar panels is just a one-day job, but in reality, the journey begins weeks or even months before the panels go up. Let’s break down the entire process so you know what to expect.
1. Initial Research And Choosing A Solar Provider
Most people start by learning about solar energy and searching for companies. This stage can take a few days or several weeks, depending on how quickly you gather information and make decisions. Comparing quotes, reading reviews, and checking credentials are all important.
- Typical time: 1 to 3 weeks
- Fast-track tip: Prepare your recent electric bills and roof information before reaching out.
Many homeowners underestimate how much time they should spend here. The best solar companies often have busy schedules, so reaching out to several installers at once can help you get faster responses. Think about your long-term energy goals. Do you want to cover 100% of your electricity use, or just a part?
Knowing this helps you find the right installer and system size.
Also, check if your state or city has special incentives, rebates, or solar programs. Some areas offer discounts that could affect which provider you choose. Reading real customer stories can show you what to expect from installers. Don’t be afraid to ask installers for addresses of homes they’ve worked on nearby.
Non-obvious Insight:
If you live in a neighborhood with many solar homes, neighbors can be a great source of advice. They might recommend installers who are already familiar with local rules, which speeds up the process.
2. Site Assessment And Home Evaluation
After you contact a solar company, they will schedule a visit to check your roof’s condition, size, and sun exposure. Sometimes, this visit can happen within a few days if the company has open slots.
- Typical time: 1 day to 2 weeks
- Key steps: Roof inspection, shading analysis, and checking electrical panels.
- Non-obvious insight: If your roof needs repairs, factor in extra time for that work before going solar.
During the assessment, the team looks for things you may not have considered. For example, large trees or nearby buildings can cast shade and lower your panel output. They’ll use tools like a solar pathfinder or digital camera to measure the sunlight your roof gets over a whole year, not just on sunny days.
They’ll also check the angle and direction of your roof, since south-facing roofs usually get the most sun in the Northern Hemisphere.
Another key part is checking the age and strength of your roof. Most solar panels last 25 years or more. If your roof will need replacing in the next 5–10 years, it’s smarter to do that before installing solar. Replacing a roof under existing panels is more expensive and time-consuming.
The home evaluation also includes checking your main electrical panel. Some older homes need panel upgrades to safely handle the new solar system. This extra work can add days or weeks to your timeline. Ask your installer to explain their findings in simple terms—don’t hesitate to ask “why” if you’re not sure.
Example:
If the inspector finds a cracked rafter or soft roofing material, it could mean extra repairs. Catching this early avoids big headaches later.
3. System Design And Proposal
Once the assessment is done, the company’s engineers design a custom system for your home. They’ll calculate how many panels you need, where to place them, and estimate costs and savings.
- Typical time: 1 to 3 weeks
- Details matter: Design changes (like adjusting panel layout) can add time.
- Insider tip: Approve the design quickly to avoid delays.
The design phase is more detailed than most people expect. The installer considers not only your roof but also local building codes, fire regulations, and wind/snow load requirements. For example, some cities require a certain distance (“setback”) between panels and the edge of your roof for safety.
This can limit how many panels you can fit.
You’ll receive a proposal showing expected energy production, savings, warranties, and often a 3D drawing of your roof with panels. If you want to add features like a battery backup, EV charger, or monitoring system, tell your installer now—not after the design is finished.
Some homeowners request changes to the layout for looks or future plans (like adding a skylight). Every change means the design must be updated and sometimes re-approved by an engineer. Approving the final design quickly helps keep things on track.
Non-obvious Insight:
If you want to finance your system (such as a loan or lease), start the application early. Financing approval can sometimes take as long as permitting.
4. Permitting And Paperwork
This stage surprises many people. Local governments often require permits before you install solar panels. The solar company usually handles the paperwork, but approval times depend on your city or county.
- Typical time: 2 to 8 weeks
- What’s involved: Building permits, electric utility approval, and sometimes homeowners association (HOA) permissions.
- Non-obvious insight: Some cities process permits in days, while others take months—ask your installer about average wait times in your area.
Permitting includes several layers. First is the building permit, which checks that your installation meets local safety codes. Some places require structural review to ensure your roof can handle the extra weight. Next is electrical permitting, making sure your wiring is safe and up to code.
If you live in a historic district or have a strict HOA, extra steps may be needed. HOAs often want to approve the look and placement of panels. In some cases, you may need to attend a board meeting or submit photos.
This can add several weeks, especially if the HOA meets only once a month.
Your utility company also needs to approve your system. They want to make sure your solar setup won’t cause problems with the grid. Utilities may require their own application, engineering review, or even a fee.
Example:
In areas with lots of solar installations, cities may have a streamlined “over-the-counter” permit process. In places with less experience, paperwork can take much longer. Always ask your installer about local averages—they know where the bottlenecks are.
Non-obvious Insight:
If you want to add solar later to a home under construction, try to combine permits. Getting solar and building permits together saves time and money.
5. Ordering Equipment
Once permits are in hand, the company orders your panels, inverters, and other parts. Delays can happen if specific models are out of stock.
- Typical time: 1 to 4 weeks
- Quick tip: Choose common panel brands to avoid backorders.
Solar equipment comes in many brands and models. Some homeowners want the highest efficiency panels or special features like black-on-black panels for better looks. While these can be a good choice, they may not always be in stock.
Installers often have preferred suppliers and can check what’s available quickly. In recent years, global supply chain disruptions have caused unexpected delays for certain products, especially batteries or microinverters. If you’re in a hurry, ask your installer which brands or models are shipping now.
Example:
If you choose a popular panel like Qcells or Canadian Solar, your wait may be shorter. Picking a rare or newly released model could add weeks to your timeline.
Non-obvious Insight:
Sometimes, installers can “reserve” equipment for your project as soon as your contract is signed, even before permits arrive. Ask if this is possible to shorten waiting times.
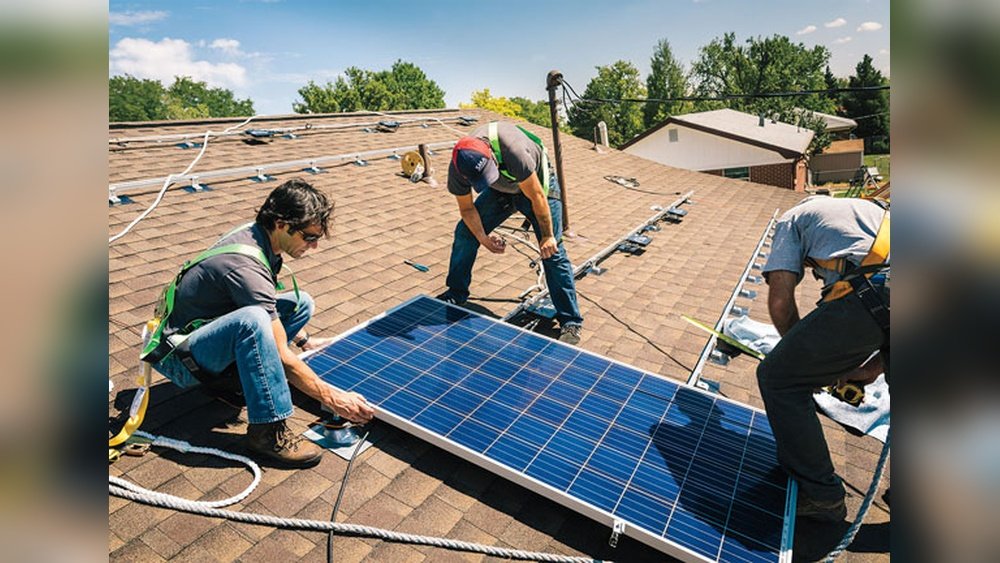
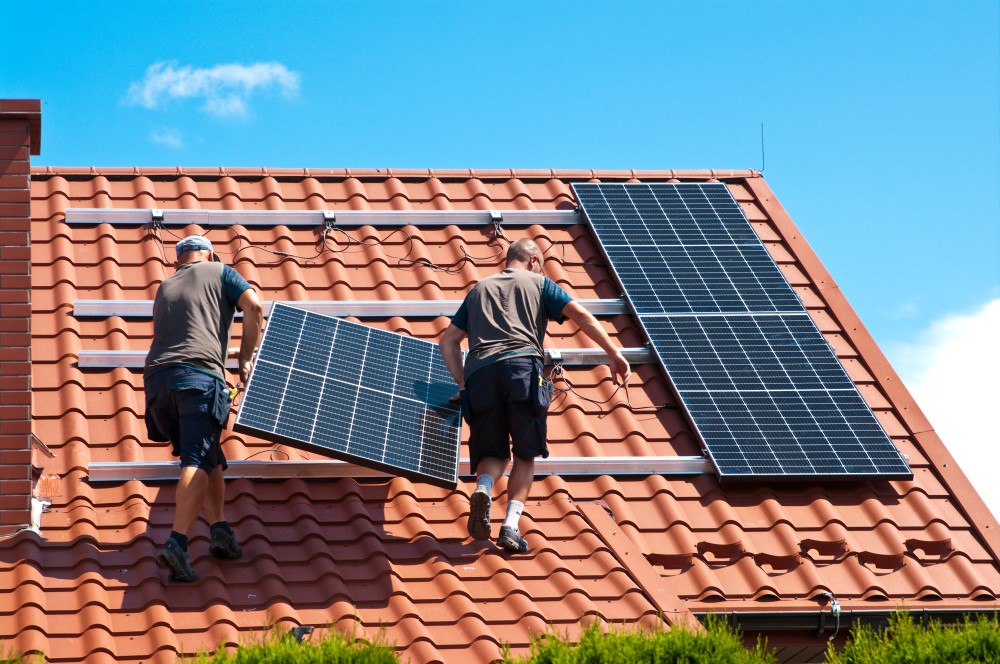
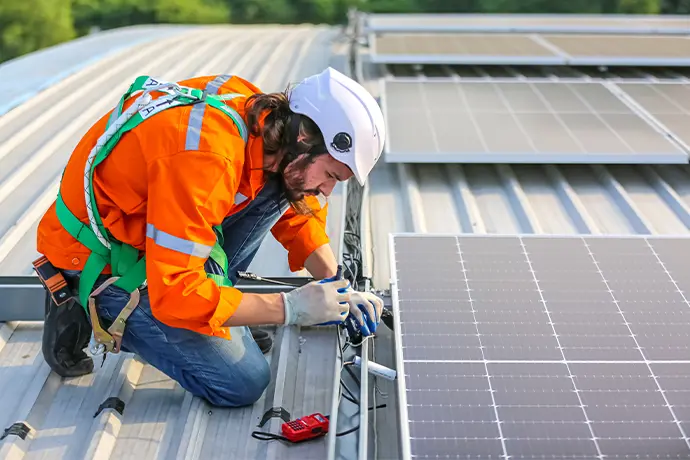
6. Installation Day(s)
This is the most visible part—actually putting the panels on your roof. For most homes, the physical work is faster than people think.
- Typical time: 1 to 3 days for most homes
- Larger or more complex roofs can take longer.
- Example: A simple, single-story home may take just one day.
The crew usually arrives early in the morning. They start by setting up safety lines, staging equipment, and reviewing your installation plan. Most teams work efficiently, with each member focused on a specific task.
For single-story homes with easy roof access, installation is often complete in one day. Two-story homes, tile roofs, or homes with complicated layouts (like dormers or skylights) can take two or three days. If your electrical panel needs upgrades or you’re adding a battery system, expect extra time.
After mounting the racks, the team carefully places each panel, connects wiring, and installs the inverter. They’ll also ground the system and set up monitoring equipment. Quality installers take time to test every connection and seal every hole to prevent leaks.
Example:
A home with a single, clear roof plane and no obstructions may be finished by mid-afternoon. A home with multiple roof faces, vents, or chimneys may require careful panel placement, taking longer.
Non-obvious Insight:
Installers may split large projects into phases if weather changes or if city rules limit work hours. Ask your installer for a daily plan so you know what to expect.
7. City Or Utility Inspection
After installation, an inspector from your city or utility checks the system. They make sure everything follows safety codes and works correctly.
- Typical time: 1 day to 2 weeks
- Common delay: Scheduling the inspection, especially in busy seasons.
The inspection is important for safety and code compliance. The inspector checks that the panels are secure, wiring is correct, and all labels are in place. They may also test the system with your installer present.
If the inspector finds an issue, the installer must fix it and schedule a re-inspection. Common issues include missing labels, incorrect breakers, or incomplete paperwork. Most professional installers rarely fail inspections, but it can happen.
Some cities combine building and electrical inspections into one visit, while others schedule them separately. Utility companies may send their own inspector to check the connection to the grid.
Example:
In busy cities, inspectors may be booked out for a week or more. In smaller towns, they may visit the next day.
Non-obvious Insight:
Ask your installer if you need to be present for the inspection. In most cases, you don’t, but it’s good to know in advance.
8. Permission To Operate (pto)
Before you can turn on your system, you need final approval from the utility company. This “permission to operate” is the last official step.
- Typical time: 1 to 3 weeks
- Pro tip: Ask your installer to submit PTO paperwork as soon as possible to speed things up.
This step is sometimes the most frustrating, as you’re so close to using solar power. The utility reviews your system’s paperwork, checks the inspection results, and often updates your utility meter to track energy sent back to the grid.
Some utilities handle this in days, while others take weeks, especially if they’re understaffed or if there’s a surge in new solar projects. Your installer usually handles all communication but may need your signature or utility account number.
Example:
A homeowner in California received PTO in three days after inspection, but a homeowner in New Jersey waited two weeks due to a backlog at the utility company.
Non-obvious Insight:
If your utility requires a new bi-directional meter, ask about the installation schedule. Sometimes the meter swap is the final hurdle.
9. Activation And Monitoring Setup
Once you get the green light, your system is turned on. The installer may help connect your monitoring app so you can track your energy production.
- Typical time: Same day as PTO
This is the most exciting step for many homeowners. The installer will show you how to read your inverter, use the monitoring app, and understand your new energy bill. They may also explain how to turn the system off for maintenance or emergencies.
Most modern solar systems come with online monitoring, so you can see your panel output, savings, and sometimes even your home’s real-time energy use.
Example:
Some installers offer a “solar celebration,” taking a photo with you next to your new panels and sharing it with their team or on social media.
Non-obvious Insight:
Check your monitoring app regularly in the first few weeks. It’s a great way to catch any issues early, like a panel not reporting or a loose wire.
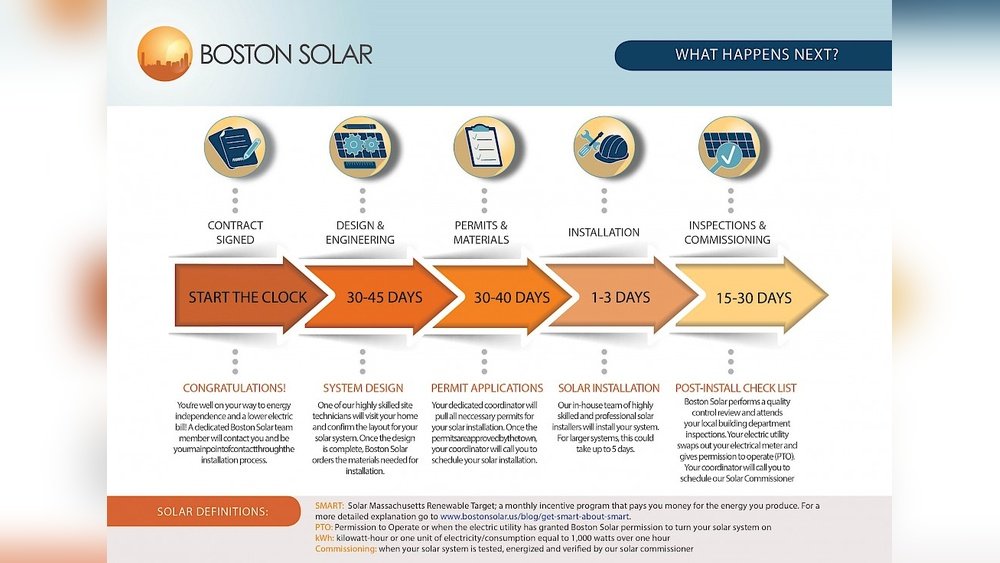
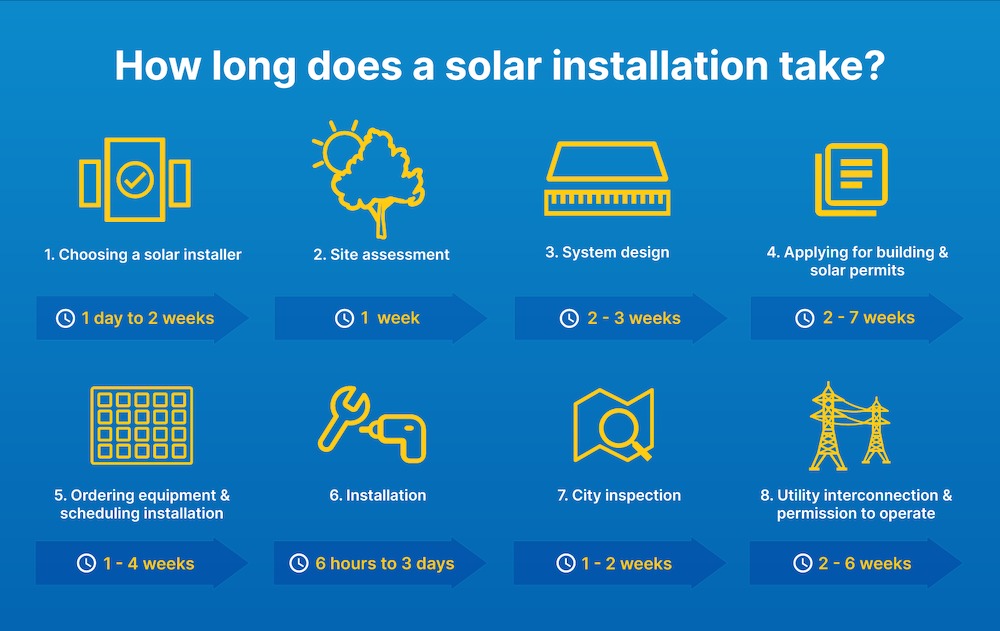
Average Total Timeline: What Most Homeowners Experience
When you add up all the steps, a typical solar panel installation takes between 2 and 6 months from your first inquiry to having a working system. The actual installation on your roof is just a small piece of the timeline.
Here’s a summary in a simple table:
| Step | Typical Duration | What Can Affect It |
|---|---|---|
| Research & Choosing Installer | 1–3 weeks | Your speed, installer response |
| Site Assessment | 1 day–2 weeks | Scheduling, roof issues |
| System Design | 1–3 weeks | Design changes, approvals |
| Permitting | 2–8 weeks | City workload, HOA rules |
| Equipment Order | 1–4 weeks | Supply chain, product choice |
| Installation | 1–3 days | Weather, roof complexity |
| Inspection | 1 day–2 weeks | Inspector availability |
| PTO/Activation | 1–3 weeks | Utility company speed |
While this table shows typical times, keep in mind that overlapping steps can shorten the total time. Some companies start ordering equipment or scheduling inspections before permits arrive, as long as local rules allow it. Asking your installer how they schedule each step can reveal ways to save time.
Credit: solarpathnsw.com.au
What Factors Can Speed Up Or Slow Down The Process?
No two solar installations are the same. Here are the most common factors that change the timeline:
Location And Local Rules
Some cities have fast, digital permit systems, while others require more paperwork and waiting. If you live in a place with a strong solar market, things often move faster.
For example, California cities often process solar permits in a week or less using online systems. In contrast, rural areas or places new to solar may take longer as staff review each application by hand. Some cities even require public notices or neighbor approval, which adds time.
Non-obvious Insight:
If your city offers an “express” solar permit, ask your installer to use it. This can cut weeks off the process, but not all installers are familiar with every local program.
Roof Condition And Complexity
A new, simple roof makes things easy. If your roof needs repairs, replacement, or has a complex design (like steep angles or many obstacles), expect extra time.
Tile roofs, for example, require special mounting hardware and careful work to avoid breaking tiles. Homes with many roof faces, chimneys, or skylights require extra planning and custom parts.
Example:
An asphalt shingle roof in good shape with a single, flat plane may be finished in a day. A 30-year-old roof with leaks or soft spots could need repairs before panels are installed.
Type Of Solar System
Standard rooftop solar is usually quick. If you want a battery backup or ground-mounted system, the design and installation take longer.
Battery systems require more electrical work, extra permits, and sometimes utility approval. Ground-mounted systems need digging, concrete foundations, and often more permitting.
Example:
Adding a Tesla Powerwall can add 1–3 weeks for design, permitting, and installation, especially if parts are in high demand.
Installer’s Schedule
Popular installers may be booked out for weeks, especially during busy seasons. Ask about their current timeline before signing a contract.
Spring and summer are peak times for solar, with some companies scheduling installs months out. If you want solar in time for a specific event or deadline, book early.
Non-obvious Insight:
Some smaller installers have shorter wait times and may offer more personalized service. Don’t overlook local companies just because they’re less famous.
Equipment Availability
Global supply chain issues can cause delays. Choosing panels or inverters that are in stock can save weeks.
Ask your installer for a list of equipment they can get quickly. Some brands have more reliable supply chains, especially for batteries or smart inverters.
Weather
Bad weather can delay the installation, especially in winter or rainy seasons.
Installers don’t work on wet or icy roofs for safety reasons. Even a few rainy days can push your installation back a week or more.
Homeowners Association (hoa) Rules
Some neighborhoods require HOA approval before you can install solar panels. This can add days or weeks, depending on how quickly your HOA responds.
HOA boards may want to review your plans, see sample photos, or even visit your home. If your HOA only meets monthly, delays are common.
Utility Company Procedures
Some utilities process applications and permissions quickly, while others are slower. Your solar company should know the average wait time in your area.
In some regions, utility companies are overwhelmed by new solar applications. This can slow down both approvals and meter installations.
Step-by-step: What Happens On Installation Day?
The installation day is when most people get excited. Here’s what to expect:
- Arrival and Setup: The crew arrives, reviews the plan, and sets up ladders, safety gear, and materials.
- Roof Preparation: Workers mark where the racking system (which holds the panels) will go and check the roof for any last-minute issues.
- Racking Installation: The racking is attached to your roof, carefully sealed to prevent leaks.
- Panel Placement: Solar panels are mounted onto the racks and wired together.
- Inverter and Wiring: The inverter (which turns solar DC power into usable AC power) is installed, usually near your main electrical panel. Wiring connects everything.
- System Testing: The crew checks all connections, tests the system, and cleans up.
- Final Walkthrough: The installer explains how your system works and what happens next.
A small home can be done in one day. Larger or multi-story homes may take two or three days, especially if additional electrical work is needed.
During the process, you might hear drilling, see workers moving up and down ladders, and smell sealants used to waterproof roof penetrations. Good installers keep noise and mess to a minimum. They’ll also take care to protect your landscaping and clean up all debris when finished.
Example:
Some installers bring a portable bathroom for multi-day jobs. If you’re concerned about pets or young children, ask how the team will keep work areas safe and secure.
Non-obvious Insight:
Installers often take photos at each step for their records. Ask if you can get copies for your own records or future home buyers.
Credit: tasmaniasafersolar.au
How Solar Panel Installations Differ: Home, Business, And Large Projects
Not all solar installations follow the same timeline. Here’s how different types compare:
Residential Homes
Most homes follow the standard timeline—2 to 6 months from first call to activation, with actual installation in 1 to 3 days.
Residential projects are usually straightforward, but things like adding a battery or EV charger can add time. Homeowners are often more involved in design choices, so quick responses can help speed up the process.
Commercial Buildings
Businesses often have bigger roofs and more complex electrical needs. The design, permitting, and inspection stages take longer, sometimes up to 6 to 12 months. Actual installation may take a week or more for large commercial systems.
Commercial systems must meet stricter fire and safety codes. They may also need structural engineering reports or upgrades to handle the extra load. Businesses often need to coordinate with multiple departments (operations, finance, maintenance), which can slow decisions.
Example:
A warehouse in a city with streamlined permits might finish in 5 months. A hospital or school with strict safety rules could take a year or more.
Non-obvious Insight:
Commercial solar often involves utility “demand charges” and complex billing. It’s smart to work with an installer experienced in commercial projects.
Large-scale Solar Farms
Utility-scale solar farms can take years to plan, permit, and build. These projects involve land surveys, environmental studies, and coordination with many agencies. The construction phase alone can last months or years.
Solar farms need approval from landowners, local governments, environmental agencies, and sometimes the public. Building access roads, fences, and utility connections adds time.
Example:
A 5-megawatt solar farm in a rural area may take two years from idea to completion, even before the first panel is installed.
Common Delays And How To Avoid Them
Understanding where delays happen helps you take action. Here are the most frequent causes and what you can do:
Permitting Delays
This is the number one bottleneck in many areas. Cities with slow or manual systems take longer.
- What you can do: Choose a solar company with local experience. They know how to navigate the process and may have contacts at the permit office.
Ask your installer if they use electronic permitting portals. If your city is known for slow permits, request regular updates so you’re not left in the dark.
Roof Repairs
If your roof is old or damaged, you’ll need repairs or replacement before solar can be installed.
- What you can do: Get a roof inspection early. If repairs are needed, schedule them right away.
Some solar companies can coordinate roofing repairs for you, which saves time and reduces hassle. If not, ask for trusted roofer recommendations.
Hoa Or Neighborhood Approval
HOAs sometimes have strict guidelines or paperwork.
- What you can do: Contact your HOA as soon as possible. Ask your installer for tips—they often have experience with common HOA forms.
Provide clear photos and detailed plans in your application—this helps avoid back-and-forth questions.
Equipment Backorders
Special panel models or unique inverters may be out of stock.
- What you can do: Ask your installer which equipment is available now, and consider flexible options.
If you want a specific brand or look, be ready to wait—or ask about close alternatives with similar performance.
Inspection Scheduling
City inspectors and utility companies can be booked up, especially during busy seasons.
- What you can do: Ask your solar company to schedule inspections as soon as possible and keep you updated.
If you’re home during the inspection, make sure gates are unlocked and pets are secured. This avoids rescheduling.
Non-obvious Insight:
If you work from home, ask if installation or inspection will affect your internet or power. Some steps may require short outages.
How To Make Your Solar Installation Faster
If you’re eager to start saving money, here are some practical ways to speed up the process:
- Gather all your electric bills and roof details before meeting with installers.
- Respond quickly to emails or requests for information from your solar company.
- Approve the design and contract as soon as you’re satisfied.
- Choose standard, readily available panels and equipment.
- Make sure your roof is in good condition before starting.
- Contact your HOA early if needed.
- Ask your installer for a timeline and regular updates.
You can also ask if your installer offers online portals for tracking progress. Some companies provide real-time updates so you always know what’s happening.
Non-obvious Insight:
If you’re planning home renovations, coordinate solar work so contractors aren’t in each other’s way. For example, don’t schedule roofers and solar installers at the same time.
Real-world Examples: How Long It Took For Actual Homeowners
Hearing from real people can help you understand what to expect. Here are some examples:
- In California, a homeowner went solar in 10 weeks. Fast permitting and a simple roof helped.
- A family in Texas needed roof repairs first. Their timeline was 5 months, with most of the wait for permits and inspections.
- In New York, a city with strict rules, one installation took 7 months due to paperwork and utility delays.
- A business owner in Arizona completed a large system in 9 months, mostly waiting for city approval.
These stories show how location, roof condition, and paperwork can make a big difference.
Example:
In one case, a homeowner in Florida saw hurricane season delay their project by a month. Weather and local emergencies can add unexpected time, so plan with some buffer.
Non-obvious Insight:
Some homeowners report that referrals or repeat customers get faster service from installers, as they already have records and know the process.
Cost Vs. Time: Is A Fast Install Worth It?
Some people want their solar panels up as quickly as possible, but speed isn’t always the best choice. Here’s why:
- Rushing the design can lead to mistakes or a less efficient system.
- Skipping roof repairs can cause leaks or problems later.
- Fast installs may cost more if you choose premium, in-stock equipment.
The smartest path is a balance—be prepared, communicate well, and work with a quality installer.
A rushed job may skip important steps, like securing proper permits or double-checking wiring. This can lead to safety issues or future repairs. If an installer promises to finish in record time, ask what steps they’re skipping or overlapping.
Non-obvious Insight:
Some incentives are tied to quality standards. If you rush and miss required inspections, you might lose out on rebates or tax credits.
How Installation Time Affects Solar Incentives
Some solar incentives and tax credits have deadlines. For example, the U. S. federal solar tax credit requires your system to be “placed in service” by a certain date.
- If you’re aiming for a tax credit or rebate, start early.
- Ask your installer to confirm that the timeline fits your goals.
Missing a deadline by even a few weeks can mean losing thousands of dollars.
If your goal is to claim an incentive this tax year, allow extra time for possible delays. Some states have yearly rebate “pools” that run out if too many people apply late in the year.
Example:
A homeowner who started the process in October but didn’t get PTO until January had to wait an extra year to claim the tax credit.
What Installers Wish Homeowners Knew
After talking with many solar professionals, here are two things beginners often miss:
- Permitting is unpredictable: Even the best installers can’t control city or utility delays. Be patient and plan for some flexibility.
- Your roof matters: A strong, recent roof saves time and money. Old or complex roofs can add weeks—or force you to pause the project.
Installers appreciate customers who ask questions and stay involved, but understand that some steps are beyond anyone’s control.
Non-obvious Insight:
Asking for weekly updates keeps everyone on track and shows you care about the process.
Solar Panel Installation: Step-by-step Timeline Example
To make things even clearer, here’s a sample timeline for a typical home:
| Week | Action | Notes |
|---|---|---|
| 1 | Contact installers, get quotes | Gather electric bills, roof info |
| 2 | Site assessment scheduled | Installer visits home |
| 3–4 | Design and proposal | Approve or request changes |
| 5 | Permitting paperwork submitted | Wait for city approval |
| 6–9 | Permitting in progress | Delays possible |
| 10 | Permits received; equipment ordered | Schedule installation |
| 11 | Installation day | 1–2 days for most homes |
| 12 | Inspection by city/utility | Can be same week or later |
| 13 | Permission to operate | System activated |
Your timeline may be shorter or longer, but this example shows the main steps and where delays can happen.
Non-obvious Insight:
Overlap steps where possible. For example, you can finalize financing and start HOA approval during the permitting phase.
Credit: www.solarreviews.com
Frequently Asked Questions
How Long Does The Actual Installation Of Solar Panels Take?
For most homes, the physical installation takes 1 to 3 days. A simple, single-story home may be finished in one day. Larger or more complex homes may require two or three days, especially if special electrical work is needed.
Why Does The Whole Process Take Months If The Installation Is So Quick?
The majority of the time is spent on design, permitting, equipment ordering, and inspections. These steps involve waiting for approval from cities, utilities, or HOAs. The solar company handles most of this, but paperwork and scheduling can take weeks or months.
What Can I Do To Make My Solar Installation Go Faster?
Prepare your electric bills, roof details, and HOA paperwork before you start. Respond quickly to requests from your installer and choose standard panels that are in stock. Make sure your roof is in good condition to avoid repair delays.
Does Weather Affect The Installation Timeline?
Yes, bad weather can delay installation, especially rain, snow, or strong wind. Most installers will reschedule for safety. Delays are more common in winter or rainy seasons.
Will I Lose Power During Installation?
Most of the work happens on your roof, so you’ll have power almost the whole time. There may be a short outage (usually less than an hour) when the system is connected to your main panel. The crew will tell you before shutting power off.
Where Can I Learn More About Solar Panel Installation Timelines?
For more data and guidance, check resources like the U.S. Department of Energy’s Homeowner’s Guide to Going Solar. This site offers step-by-step advice, FAQs, and statistics from real projects.
Switching to solar is a smart choice for many people, but it helps to know the process and plan ahead. With clear expectations and a little preparation, you’ll be enjoying clean, renewable energy before you know it.