Testing a solar panel is not just for engineers or electricians. Anyone who owns or plans to buy solar panels should know how to check if they work properly. Solar panels are an investment. If they do not generate enough power, or if they break down early, your money can be wasted. Even new panels can have problems straight from the box. Sometimes, weather, installation mistakes, or small cracks can cause panels to fail quietly, reducing your energy savings month by month.
Many people think you need special tools or deep electrical knowledge to check solar panels. This is not true. With a few simple devices—a multimeter, some basic safety steps, and a bit of patience—you can test your solar panels at home. This skill is useful for homeowners, DIY hobbyists, and even small businesses that rely on solar energy.
This guide explains, in simple and clear English, how to test a solar panel. You will learn why testing matters, which tools to use, how to prepare, and step-by-step methods for different types of tests. The article also covers common mistakes, important safety rules, and what to do if you find a problem.
By the end, you will have the confidence and skills to check your own solar panels—and protect your investment for years to come.
Why Test A Solar Panel?
Solar panels last a long time, but they are not perfect. Testing is important for several reasons:
- Confirm performance: Panels may not always give their rated output. Weather, dust, or hidden damage can reduce power.
- Detect faults early: Problems like cracks, loose wires, or weak cells may not be visible. Early testing finds these issues before they get worse.
- Maximize energy savings: Panels that underperform cost you money. Regular checks help keep efficiency high.
- Check after installation or repair: Always test new panels, or after any repair work, to ensure everything works as promised.
- Warranty claims: If you find a problem early, you can often get a free replacement or repair from the manufacturer.
Many people miss the chance to catch small problems early. Even a little drop in output—say, 10%—can cost you hundreds of dollars over the panel’s life. Regular testing is a smart way to protect your investment.
Basic Concepts Of Solar Panel Testing
Before you start, it helps to know some basic ideas about how solar panels work and what you will be measuring.
Voltage, Current, And Power
- Voltage (V): The force that pushes electricity. Measured in volts.
- Current (I): The flow of electricity. Measured in amperes (amps or A).
- Power (P): The amount of energy produced. Measured in watts (W). Power is Voltage × Current.
When testing a panel, you will often measure open-circuit voltage (Voc) and short-circuit current (Isc).
Open-circuit Voltage (voc)
This is the highest voltage the panel can produce when no load is connected. It tells you the panel is able to generate electricity.
Short-circuit Current (isc)
This is the maximum current the panel can produce when the positive and negative leads are connected with no resistance (a direct short). It tells you how much current the panel can deliver.
Maximum Power Point (pmax)
This is the point where the combination of voltage and current gives the highest power output. Usually, you do not need special equipment to check this at home. But understanding it helps you compare your test results with the panel’s rating label.
Tools Needed For Solar Panel Testing
You do not need expensive equipment to test a solar panel. Here are the essential tools:
- Digital Multimeter: Measures voltage, current, and resistance. Choose one with DC (direct current) capability and ranges high enough for your panel.
- Solar Irradiance Meter (optional): Measures sunlight strength (W/m²). Useful for more precise testing, but not essential for basic checks.
- Load (Resistor or Lamp): For power tests. A 12V car bulb or a high-watt resistor can work.
- Protective Gloves and Safety Glasses: Protect your hands and eyes during tests.
- Wires with Clips or Probes: For safe, easy connections.
- Notebook and Pen: To record your results.
Some people use a clamp meter to measure current without breaking the circuit, but it is not required for basic tests.
Preparing For The Test
Taking a few simple steps before you begin helps ensure safety and good results.
1. Choose The Right Time
- Test in full sunlight, around midday, when the sun is highest.
- Avoid cloudy or rainy days. Weak sunlight gives low readings.
2. Clean The Panel
- Wipe off dust, dirt, leaves, or bird droppings. Even a little dirt can reduce output by 5–20%.
3. Check For Visible Damage
- Look for cracks, broken glass, burned spots, or loose wires. Fix these before testing.
4. Read The Panel Label
- Find the sticker or plate on the back of your panel. Note these numbers:
- Maximum Power (Pmax)
- Voltage at Pmax (Vmp)
- Current at Pmax (Imp)
- Open-Circuit Voltage (Voc)
- Short-Circuit Current (Isc)
Write these numbers down. You will compare them with your test results.
Safety Tips For Testing Solar Panels
Solar panels generate real electricity—sometimes enough to cause injury or fire. Always follow these safety rules:
- Never touch bare wires or metal parts when the panel is in sunlight.
- Wear insulated gloves and safety glasses.
- Do not short the panel for more than a few seconds.
- Do not test in rain or wet conditions.
- Keep children and pets away during testing.
- If you are unsure, ask a professional for help.
Many people forget that solar panels work whenever there is light, not just when they are connected to a system. Treat every panel as “live” during the day.
Step-by-step Guide: How To Test A Solar Panel
Now you are ready to test your solar panel. There are three main ways to check if a panel is working:
- Measuring Open-Circuit Voltage (Voc)
- Measuring Short-Circuit Current (Isc)
- Measuring Power Output with a Load
Let’s look at each method in detail.
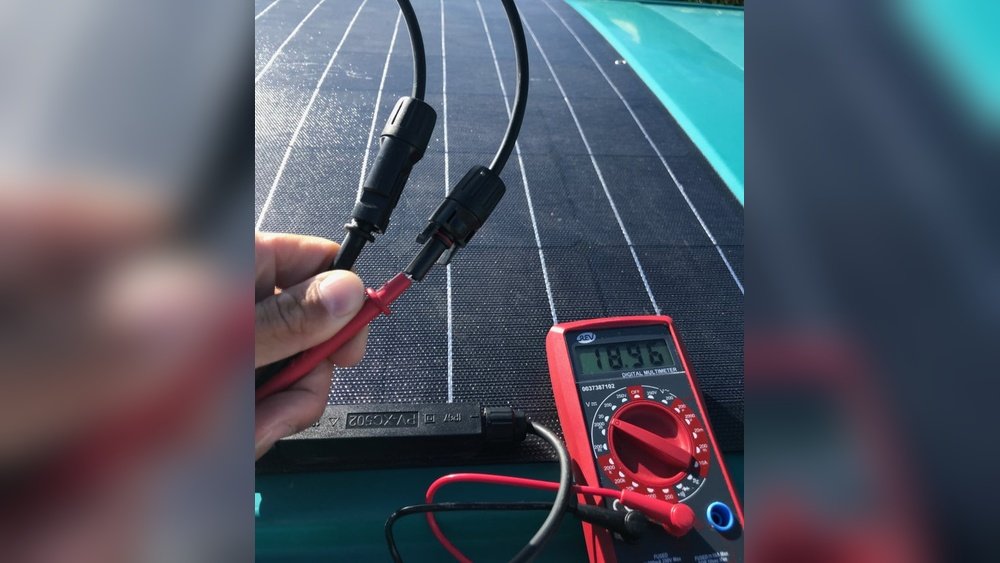
Measuring Open-circuit Voltage (voc)
This test tells you if your panel is generating the correct voltage.
Steps
- Set your multimeter to measure DC volts (choose a range higher than the panel’s Voc).
- Disconnect the panel from any system, battery, or load.
- Connect the red probe to the positive (+) panel wire, and the black probe to the negative (–) wire.
- Point the panel directly at the sun (tilt it as needed).
- Read the voltage on the multimeter display.
- Compare the result to the Voc on the panel label.
Example
If your panel’s Voc rating is 22V and you measure 20. 5V, this is normal. If you get much less (say, 10V), the panel may be damaged, dirty, or shaded.
Practical Tips
- It is normal for the measured voltage to be 5–10% lower than the label, due to temperature, sunlight angle, or small losses.
- If voltage is zero or close to zero, check your connections. If still zero, the panel may be broken.
Measuring Short-circuit Current (isc)
This test checks if the panel can deliver current.
Steps
- Set your multimeter to measure DC current (amps). Use the 10A or 20A port if available.
- Disconnect the panel from any system or battery.
- Connect the red probe to the positive (+) panel wire, and the black probe to the negative (–) wire. The meter will now act as a “short”.
- Point the panel directly at the sun.
- Read the current on the display.
- Compare this to the Isc value on the panel label.
Example
If the panel’s Isc rating is 5. 5A and you measure 5. 2A, the panel is working well. If you measure much less (say, 2A), there is a problem.
Practical Tips
- Do not keep the panel shorted for more than 10 seconds. It can heat up and damage the panel or meter.
- Always use a multimeter rated for the expected current.
Measuring Power Output With A Load
This is the closest test to real-life use. It checks how much power the panel can deliver to a device or battery.
Steps
- Connect a known load to the panel (for example, a 12V car bulb, or a resistor rated for your panel’s voltage and current).
- Measure the voltage across the load with your multimeter (DC volts).
- Measure the current going into the load (DC amps).
- Multiply voltage × current to find power (watts).
- Compare this to the panel’s Pmax rating.
Example
Suppose your panel is rated at 100W (Pmax), 18V (Vmp), and 5. 5A (Imp). You connect a load and measure 16. 5V and 5A. Power = 16. 5 × 5 = 82. 5W. This is about 82% of the rated value, which is good for home testing.
Practical Tips
- Use a load that matches your panel’s voltage and current. Too small a load can damage the panel.
- The actual output will vary with sunlight, temperature, and load quality.
Comparing Test Methods
For clarity, here’s a summary of the three main test methods:
| Test Method | What It Checks | Best For | Common Tools Needed |
|---|---|---|---|
| Open-Circuit Voltage (Voc) | Panel’s ability to generate voltage | Quick check, finding dead panels | Multimeter |
| Short-Circuit Current (Isc) | Panel’s ability to deliver current | Checking for weak or damaged panels | Multimeter |
| Power Output (with Load) | Real-world performance | Testing actual energy delivery | Multimeter, resistor/lamp |
Advanced Testing: Using A Solar Charge Controller
If you want to test your solar panel in a setup closer to real use, you can use a solar charge controller and a battery.
Steps
- Connect the panel to the charge controller, then connect the controller to a battery.
- Use the controller’s display to see voltage, current, and power.
- Many controllers show daily energy (Wh) delivered.
This method gives you a real-world performance check, and it is safer for both you and the panel. Just make sure the controller and battery match the panel’s ratings.
How To Test Multiple Panels In A System
If you have more than one panel (for example, in a home solar system), you may need to test them together or one by one.
Series Connection
Panels in series add their voltages. Test Voc by measuring across the whole string. If the total voltage is much lower than expected, one panel may be dead.
Parallel Connection
Panels in parallel add their currents. Test Isc by measuring the current from the combined wires. If total current is low, disconnect and test each panel to find the weak one.
Finding A Weak Panel
Sometimes one panel can bring down the whole system. Test each panel separately, as above, to find the faulty unit.
Credit: resources.energybin.com
Common Problems And What The Results Mean
Knowing how to interpret your test results is as important as the test itself.
Low Open-circuit Voltage
- Possible causes: Shading, dirt, cracks, water inside panel, broken connections.
- Action: Clean the panel, check for damage, retest. If still low, replace the panel.
Low Short-circuit Current
- Possible causes: Weak cells, aging, partial shading, internal corrosion.
- Action: Check for shade, clean the panel, compare with other panels of the same type.
No Output (zero Voltage/current)
- Possible causes: Broken wires, connector issues, severe internal damage.
- Action: Inspect all wiring, check with another multimeter, try testing at the panel terminals.
Output Drops In Bad Weather
- This is normal. Cloudy or rainy weather can reduce output by 80% or more.
Output Lower Than Label
- Most panels produce 70–90% of rated output in home tests, unless you have perfect sunlight and alignment.
- If your panel is much below this (say, 50% or less), investigate further.
How Weather And Sunlight Affect Testing
Solar panels only give their full output in strong sunlight. Here are some important factors:
Sun Angle
Panels work best when the sun’s rays hit them directly (perpendicular). If the sun is low, or the panel is not aimed correctly, output drops.
Sunlight Strength (irradiance)
Measured in watts per square meter (W/m²). Standard test conditions use 1000 W/m². Most home tests happen at 700–900 W/m². Less sunlight means less power.
Temperature
Panels actually work a bit better in cooler temperatures. On hot days, voltage can drop.
Here’s how sunlight and weather can affect output:
| Condition | Expected Output | Notes |
|---|---|---|
| Full sun, midday, clear sky | 80–100% of rated | Best time for testing |
| Cloudy sky | 20–50% of rated | Not reliable for testing |
| Early morning/late afternoon | 30–60% of rated | Sun angle is low |
| Dirty or shaded panel | 10–80% of rated | Clean and remove shade before testing |
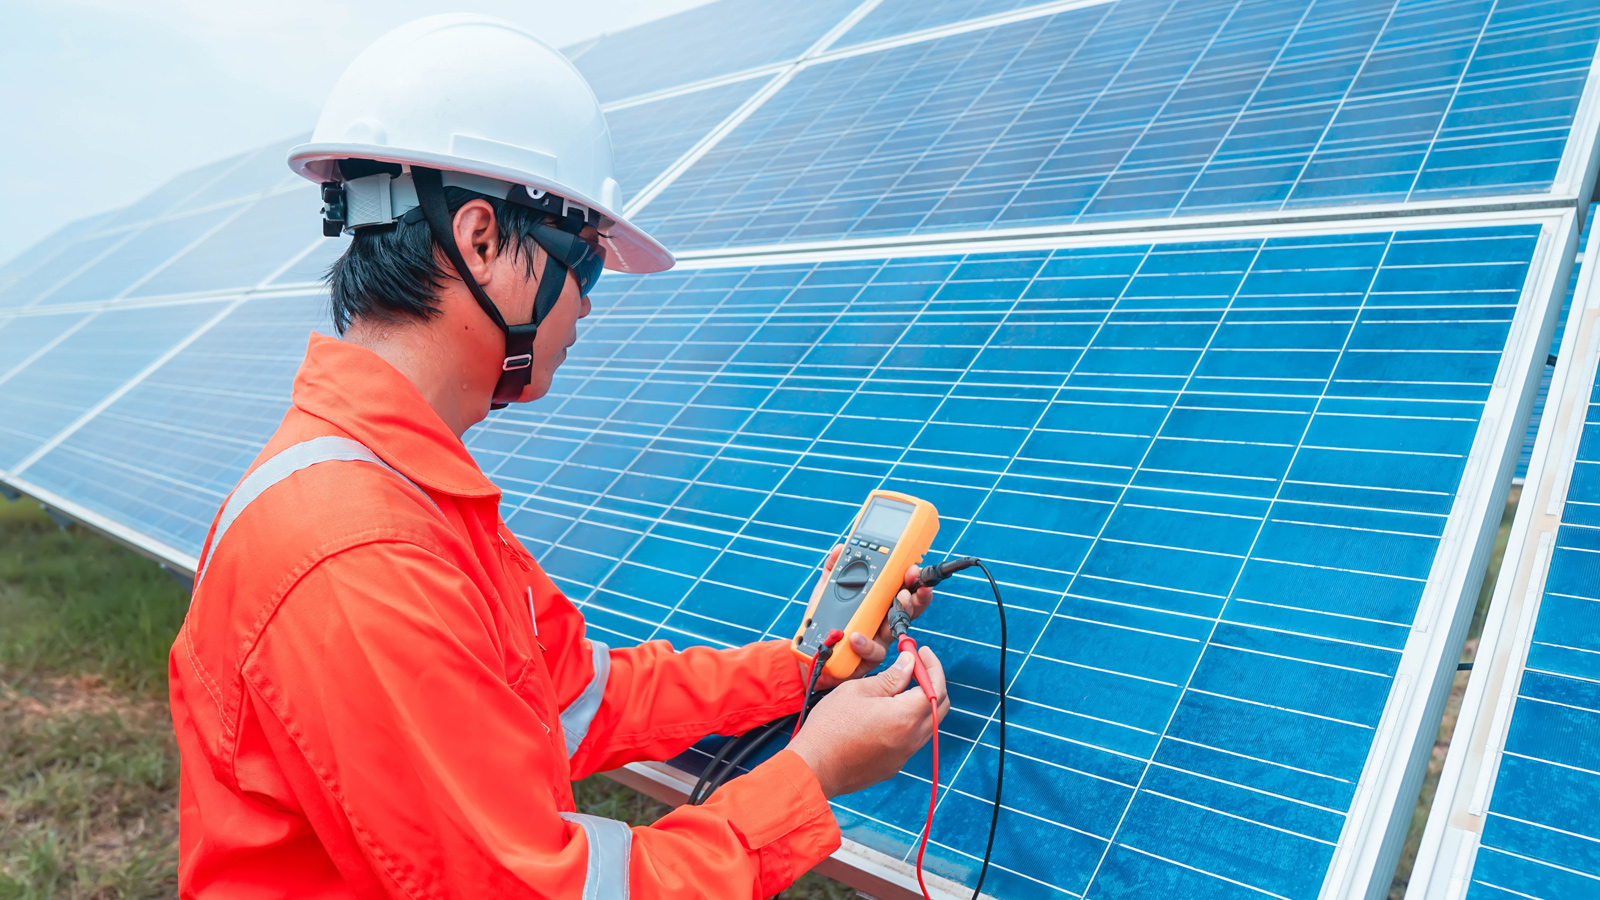
Using A Solar Irradiance Meter For Accurate Testing
For the most accurate results, professionals use a solar irradiance meter to measure sunlight strength.
- Measure the sunlight in W/m² at the panel surface.
- If sunlight is less than 1000 W/m², your panel will give less than rated output. Adjust your expectations.
Example: If sunlight is 800 W/m² (80% of standard), and your panel is rated at 100W, expect about 80W maximum.
Important Non-obvious Insights
Many beginners miss these key points:
- Panel output can drop from small cracks or microfractures you cannot see. Even new panels can be damaged during shipping. Always test before installing.
- Wiring and connections matter as much as the panel itself. Loose, corroded, or undersized wires can cause big power losses—sometimes 10–15%. Always check connections when troubleshooting.
- Partial shade affects more than just the covered area. In many panels, shade on one cell reduces the output of the whole panel.
- Panel orientation and tilt make a big difference. Testing a panel flat on the ground can give 20–40% less output compared to aiming it directly at the sun.

Credit: www.youtube.com
Practical Examples
Let’s look at a real-world example:
You have a 150W panel, rated at Voc 22.5V, Isc 8.8A. It is a sunny day, and you test as follows:
- Voc = 21.8V (good, slightly lower than label)
- Isc = 8.2A (good, about 93% of label)
- With a 12V bulb as load: Voltage = 13V, Current = 7.5A, Power = 97.5W
This shows the panel is in good health, though the power output is lower than the label. That is normal, because the load is not matched for maximum output, and sunlight is not exactly 1000 W/m².
If you tested and found:
- Voc = 10V (much too low)
- Isc = 2A (much too low)
- Load test = 20W
This suggests a damaged or partly working panel—possibly from cracks or an internal fault.
Testing Old Or Used Solar Panels
Many people buy used panels to save money. Testing is even more important in this case.
- Expect older panels to produce less power (10–20% drop is common after 10 years).
- Check for yellowing, delamination, or corrosion.
- Do a full Voc, Isc, and load test before buying.
Testing Small Solar Panels (gadgets, Lights)
For small panels (like those on garden lights or chargers):
- Use a multimeter with a lower range (0–20V, 0–2A).
- Test in the same way as large panels.
- Do not expect these panels to match their label exactly—small panels are less efficient.
Testing Large Solar Arrays (home Systems)
For systems with many panels:
- Test at the combiner box (where all panel wires meet).
- Measure total Voc and Isc for the system.
- Compare with the sum of individual panel ratings.
If you find a big difference, test each string or panel separately to find the problem.

Credit: www.youtube.com
How Often Should You Test Your Solar Panels?
- After installation: Always test new panels before final connection.
- Every 6–12 months: Check for drops in output.
- After storms or hail: Test for hidden damage.
- If you notice lower energy production: Test right away.
Regular checks catch problems early and help you get the most from your system.
What To Do If Your Solar Panel Fails The Test
If your panel does not pass the tests:
- Double-check your connections and test equipment.
- Clean the panel and retest.
- Test in full sun, at midday.
- If still bad, check the warranty. Many panels have 10–25 year warranties.
- Contact the seller or manufacturer with your test results.
Never try to repair a panel yourself unless you are qualified. Internal repairs are usually not worth the risk or cost.
Solar Panel Testing And Maintenance Tips
- Keep panels clean and free of shade.
- Check wiring and connections every few months.
- Use only proper tools—cheap meters can give false readings.
- Record your test results, so you can spot problems early.
- Teach family or staff basic testing steps, especially if you rely on solar power.
Common Mistakes To Avoid
- Testing in poor sunlight: Always test near midday, in clear weather.
- Using the wrong meter settings: Double-check your multimeter is set for DC volts or amps, and on the correct range.
- Shorting the panel too long: Keep short-circuit tests under 10 seconds.
- Ignoring safety: Even “small” panels can give a shock or cause burns.
- Not matching the load: Using a load with the wrong voltage or wattage can damage the panel or give bad results.
Quick Reference: Testing Steps
Here is a simple summary of the key steps to test a solar panel:
- Clean the panel and check for damage.
- Test open-circuit voltage (Voc) with a multimeter.
- Test short-circuit current (Isc) with a multimeter.
- Connect a suitable load, measure voltage and current, and calculate power.
- Compare results with panel label and expected values for sunlight conditions.
- Record your results for future checks.
How Solar Panel Testing Saves Money
Testing can seem like extra work, but it pays off. Here’s how:
- Catches problems early: Fix small issues before they cause big losses.
- Keeps efficiency high: Even a 5% drop in output can add up to big losses over 20 years.
- Protects your warranty: Good records make it easier to get a free replacement if needed.
- Prevents system damage: Faulty panels can damage batteries or inverters if not found in time.
When To Call A Professional
If you:
- Get confusing or dangerous results,
- Have a large or complex system,
- See burned spots, broken glass, or melted wires,
- Or if you feel unsure at any step,
Do not risk your safety. Call a licensed solar technician. They have specialized tools, like IV curve tracers and thermal cameras, for deeper diagnostics.
For more detailed technical information, you can also visit the Wikipedia Solar Panel article.
Frequently Asked Questions
How Do I Know If My Solar Panel Is Working?
Test your panel with a multimeter in full sunlight. If you get voltage close to the label (Voc) and current (Isc), your panel is working. If the output is much lower, there may be a problem.
Can I Test A Solar Panel At Night Or Indoors?
No. Solar panels need real sunlight to work. Indoor lights are not strong enough, and you will get zero or very low readings.
Is It Safe To Test A Solar Panel Myself?
Yes, if you follow safety rules: wear gloves, use the right tools, and never touch live wires. Do not test in wet conditions. If unsure, ask a professional.
What Is The Difference Between Voc, Isc, Vmp, And Imp?
- Voc: Maximum voltage with no load (open circuit)
- Isc: Maximum current with no resistance (short circuit)
- Vmp: Voltage at maximum power point (under load)
- Imp: Current at maximum power point (under load)
What Should I Do If My Panel’s Output Is Low?
First, clean the panel and check for shade or wiring problems. Test in full sun. If output is still low, compare with the label and test each panel if you have more than one. If you find a fault, contact the manufacturer for repair or replacement.
By learning how to test a solar panel, you take control of your solar investment. Regular checks, a little care, and smart troubleshooting will keep your system working efficiently for years—saving you energy and money, day after day.